Sunday, April 29, 2012

Creating a cigar box guitar changes the way you think.


I vaguely remember going to a hardware store, a secondhand store, a swap meet, or various other commercial establishments to acquire whatever I needed for a project, without thinking about how it might adapt to a CBG. 


But, those days are long gone. 


Everything I see now rattles around in my noggin and what shakes out has nothing to do with the intent in which the product was intended . . . right down to a bag of pretzels.


It's a real dilemma.  My wife won't go shopping with me.  My friends, the only two I have left, always have something more important to do, when I suggest a fun trip to somewhere.  My sons just look at me with glazed-over eyes.  And, my granddaughters simply stare at me with silly grins.  That's the upside attention.  Store clerks and their customers gaze at me quizzically and may utter something remotely connected, like, "Gee, I never thought of using it that way."  Or, "Really!"  Even, "You're shitting me, you really plan to make a guitar out of that?"


I walked into a run down, over crowded, grungy secondhand store the other day to look around, and I spotted a bedpan that was pretty beat up.  I asked the old gal running the place if she had one that was in better condition?  She said, "Oh, I can understand not wanting to sit on that old thing, but, that's all I got right now."  "I don't plan to sit on it, but that one's a little nasty to play with", I said.  She looked at me funny, like I was from another planet and asked, "Well, just how do you plan to 'play' with a bedpan?"  I said, "Music."   She said, "You sure you don't want a trumpet, the sound may be a little more enjoyable than the oompa-roompa that comes with using a bedpan, and the mouthpiece is a little smaller, hee, hee?"  "Nope", I said, "I'm gonna make a guitar out of it, and I think the sound will be just right."  She gave me the thing . . . to get me out of the store, I think . . . before other people started to question my sanity.  It's going to make a helluva guitar.


When I see a broom, I think instantly of a Lowe bow -- one-stringed instrument played by finger picking or with a stick.  Cabinet hinges, spoons and cake servers look like tail stock string retainers to me, and some are missing from our home.  Drawer pulls suddenly become sound hole covers or bridge covers, while pop rivets look good as string guides to me.  And, everything I see somehow appears in my mind as a decoration of some sort for the headstock or box of a guitar.  A cookie tin suddenly becomes a guitar body, not quite as dramatic as a toilet seat or a bed pan, but just as much fun.


Oh, well, it's a hoot building these things, but watching the expressions on people's faces is what makes it really fun.

I Don't Get It!

I was reading various posts on Cigar Box Nation, when I bumped into something a member had shared.

He introduced us to the The Loog Guitar site.  The sales hype says "The small and innovative three-string guitar that makes it fun and easy for kids to play music."

It's a site where you can buy an unfinished wood three-string guitar kit.   The kit comes with pre-formed 18- fret neck; three simple body styles; and accessories which include nylon strings.  It's ready to build and finish.  And, it's specially priced at only $195.

He stated that the company has contracted with him to produce a CD, which it can sell as an aside to help someone learn to play a three-string guitar.  This must be why this guy, who is one of the strongest supporters of the cigar box revolution, and who plays CBGs in his CD tutorials and when he is subway busking, has decided to promote the Loog.

With the abundance of moderately priced, high-quality cigar box guitars available from a vast number of qualified builders, it's difficult to understand why anyone would  pay $195 for a simple, plain vanilla kit with no special character to it -- which they must assemble?

Saturday, April 28, 2012

Swap Meet Find

Went to the monthly swap meet this morning, and bumped into a new set of CP bongos.  The guy was asking 30 bucks, but what's the purpose of going to a swap meet if you're gonna pay what they're asking, right?  It was  really cold, and the wind was blowing a gale, so I took advantage of the opportunity for bargaining.  Offered him fifteen and he took it.  These are regularly advertised for $70, so I think I did OK.  He also had an old cigar box that I couldn't live without, which will make a great guitar.

Wednesday, April 25, 2012

'Boogie Bowl'

Well, I'm back at it.

Several weeks ago I was rummaging around in an antique store and ran across a very old two-part silver serving  dish.  Originally, it enclosed a lidded glass bowl, but that disappeared long ago, leaving only the silver surround for me.  I thought, "this is so cool, and I gotta make a guitar out of it."  but, I wasn't sure just what I was going to do with it.

But, between fixing meals and doing laundry, while my wife was recovering from heart surgery, I landed on a plan to turn the silver dish into the reverse resonator guitar.  That's right, a 'reverse' resonator.  Most resonator guitars are wood bodies with metal resonators that transmit sound.  The 'Boogie Bowl' is the opposite.

If you look closely at the photo of the side of the guitar, you'll see that space separates the main dish from a thin piece that rested on top of the glass bowl insert (the missing part).  This separation offers a perfect sound opening so that I didn't need to cut sound holes in the thin circular maple piece that serves as the top (resonator) of the guitar.  It has a through-body oak neck with cherry fretboard and hand dressed and inserted frets.  The nut is corian, and the bridge is a Spanish cedar/balsa combo that encloses a piezo transducer pickup and corian saddle.  I designed the bridge to take on the basic design of the filigree decoration on the ring, and to add a little personality to the top.  It's a four-string, electro-acoustic, tuned to open G (G-D-B-g), and set up to be played with a slide.

I had to create a maple ring to attach to the thin silver 'lid', which is attached to the neck, and the circular top (the resonator) is attached to the neck as well.  The bowl is attached with screws that pass through the handles and into the neck, making this a very sanitary creation.  The mounting screw at the tailstock also serves to hold a strap button in place.

I'm not sure how much silver is in this little dandy, but I will tell you that when I drilled the hole for the output jack the drill bit passed through the side like going through butter, which suggests to me that it could be solid silver.  The patina on the silver is so cool that I decided to leave it unpolished, and it looks fantastic.

Now, how does it sound?  Well, it is awesome!  Very loud acoustically with a ton of sustain, and it sounds rich through my amp.  Most CBG resonators sound tinny, but this has a deep and solid sound.


Monday, April 9, 2012

Piezo Installation In a CBG -- 'How To'

There is abundant information available on the Internet regarding the construction and use of a transducer (Piezo).  But, the purpose of this 'How To' missal is skip all the technical jargon and to share with you how I utilize the piezo transducer in the creation of my cigar box guitars, to transmit sound to an amplifier.  I believe in the 'KISS' theory for most of what I do.  (Keep It Simple, Silly)

First, it is important to understand a transducer.  The transducer is a microphone, which picks up vibrations around it.  For more refined details, refer to the Internet jargon.

Generally, I use a disc piezo placed near the bridge on the inside of the box, but on occasion I use a rod piezo placed directly under the bridge on top of the box.  Placement of the rod is a little more involved, but it may produce better sound.  However, if you want the best sound transmission, use a magnetic pickup.

I buy my piezos with the lead wires already soldered in place.  There are many sources from which to purchase these, but I've found that Zinky (on eBay) provides the best product and price.  If you're a purist and are inclined to do your own soldering, one lead (positive) is soldered to the ceramic portion of the disc, and the other lead (negative ground) to the outside exposed metal ring of the disc.  The plain disc is also readily available.

The positive lead (usually red) will be attached to the positive post on the output jack, and the negative lead (usually black) to the ground post on the jack.  That's it.

However, I like things a little more sanitary than loose wires floating around, so I do a couple things to refine the assembly.  Leads on the piezo are short (about three inches long), but you will need a finished assembly to be 9 or 10 inches long to fit properly in the box you're using for the body of the guitar.  So, I stagger the length of the the wires coming off the piezo so the exposed ends are not next to each other.  Then, I add (solder) 7 or 8 inches of 24ga. wire to the existing leads to reach the required overall length.  When I've completed this, I slip a piece of 1/8" shrink tube over the wires (leaving only about an inch of each wire exposed to attach to the jack, and heat it with a hot air gun to make a tidy little assembly.  Then, I solder the leads to the jack, and I'm in business.  If you don't want to mess with the shrink tube, I suggest that you cover the exposed joints and twist the wires to make a better looking package.

Parts for this project will cost you about five bucks, or less.  But, if you don't mind throwing money around, you can buy the ready made harness from various sources on the eBay.  I've seen them offered from $12 to $24, plus shipping.  I think I'll continue to make mine, 'cause it's simple, and I don't like giving money away!

Placement -- The versatility of the piezo presents several options for placement in your cigar box guitar (stomp box, drum head, etc).  And, the piezo can be cut to a desired shape for ease of location, without harming it's effect.

It really doesn't matter where you place the piezo, because it will pick up sound.  But, what will matter is the quality of the sound it transmits.  Some builders locate it under the bridge; beside the bridge; on top of the box; on the outside of the bridge; under the fretboard; and even under the nut.  The options are many, but each will produce different results, and some may not be very pleasant.

Inside the bridge -- Good results can be had by embedding the piezo in the bridge, under the saddle (disc or rod), but a rod piezo seems to work better here, and it tends to produce better sound transmission.  Most rod piezos have a 'male' plug attached to the end.  If you want to attach leads directly to the output jack, simply cut off the plug, strip back the outside wire mesh (ground) and twist it into a tight lead, and then strip back a small amount of insulation from the inner lead (positive).  Solder each to the posts on the output jack, and you're ready to rock and roll.

Under the bridge -- A very good option, because the piezo reacts to vibration, is to place it under the bridge, sandwiched between the bridge and the top of the cigar box (soundboard).  In either of these options, a small hole must be drilled in the box for wire leads to pass through to be attached to the output jack.

Inside the box -- This is my favored solution for mounting a piezo.  Finding the 'right' location may be a bit of trial and error, and it may vary with each guitar you build.  But, I have found that if I position the piezo as close to the bridge as possible, and directly under the bass string, it generates the best sound.

However, in the process of trial and error, I've also learned that 'how' the piezo is mounted makes considerable difference in sound and amp feedback.  Some builders glue the piezo directly to the box surface.  Others encase the piezo in wood pieces that are glued to the surface.  Some even use a screw to attach it.  Many cover the glued piezo in various substances (silicon sealer, foam insulation, etc.).

What works best for me is to encase the piezo between two layers of double-sided 3-M picture mounting tape.  You know, the dense foam material about 1/8" thick and 1" wide, that comes in a roll, and has a green/white protective cover that can be peeled away leaving a very sticky surface.

I cut two squares from the roll, leaving the protective cover in place.  Then, I carefully center the back of the piezo on the sticky surface of one of the pieces.  Then, I pop the other sticky square surface on top of the piezo (the top is the part with the ceramic ring) -- voila, it's enclosed and ready to mount.  So, I now peel off the protective cover from the surface covering the 'top' of the piezo (make sure you remember which surface is the top, 'cause sound is transmitted better if the piezo is mounted with the ceramic ring surface next to the box).  With this done, there is still a surface with the protective cover in place, right?  Well, peel off the cover and apply a square piece of tinfoil (slightly larger than the sticky surface).  Rub hell out of the entire piece to ensure that the sticky surfaces are well adhered.  The tinfoil works to eliminate feedback.

The sound produced by this method is more mellow and less 'tinney' and 'scratchy', with no feedback at my amp.


Multiple Piezo Mounting -- By adding more than one piezo to your build, you will be offering some interesting sound options for your creation.  Wiring multiple piezos can be done in 'parallel' or 'series', but the recommended method is to wire in parallel (each piezo has it's own set of wires leading to the output jack), which produces more consistent sound results.

Adding Pots and Switches -- Volume potentiometers and  switches can be added to your piezo harness (a 250K audio taper pot or 500K pot can be used, but the 500K seems to work better), if you wish to control sound at the guitar, rather than at the amp.

Options -- The interesting thing about creating cigar box guitars is that there are no rules.  Experiment.  If something does not work like you want it to, try something different.  It is your individual ideas that will make your guitar unique and different, so don't be afraid to step outside the box.

You're in business!  Play hell out of your guitar, while driving your wife, kids, and pets nuts.    q:-)

Wednesday, April 4, 2012

Rate Your Pain!

I had the opportunity recently to 'enjoy' the medical miracle of removing an irregularly shaped stone from my kidney by way of a long and flexible instrument the size of a spaghetti noodle.

This doesn't sound too bad, right?  Well, there is a reason the ol' sawbones does this while you're in a drug-induced state.

I said the probe is flexible, and it is, just like a remote controlled noodle with a headlight to look around in your pee-pee (it's so little by the time you're asleep, that it looks like a button on a fur coat) as it travels toward your kidney.  The thing also comes equipped with a mini scalpel and small adjustable fingers to grab stuff (in my case the stone).

Imagine for a minute, all that stuff crammed into your little pee-pee.  Makes for a delightful moment, right.

It's not bad enough that they go probing around in there, but then they may decide to leave something behind (a stint) so your water works will perform better -- but it has to be removed at some point, so you live with that mind game for a few days.

But, before any of this happens, you're visited in the emergency room by a lovely young lass named Jill, who takes all your vitals and attempts to make you feel good.  Fat chance of that happening with a boulder stuck in your plumbing.

The real fun for me came when Jill asked, "Can you rate your pain for me?"

I said, "Rate my pain?  What in hell does that mean?  It hurts bad!"

Jill said, "On a scale of '0' to '10', tell me how bad it hurts."

Well, I said, "If '0' is no pain, and '10' is like a gunshot wound to the penis, I guess I'm at about an eight, and by the way I think you're a '10'."

The last thing I remember, before the sedative kicked in, is Jill smiling.  I'm not sure if she was smiling about the rating, or if it was the button she was holding in her hand.

Monday, April 2, 2012


Gotta have one of these.  Just think of the melodies that will come to mind when you're standing there doing your business.

Thursday, March 29, 2012

I've Been Distracted

I've not posted in a couple weeks, but there is a good reason.


My wife was diagnosed with a serious heart condition, which required surgery.  All went as projected, and she is now home recuperating.  It will be a fairly long process, but the prognosis is good.


So, please hang in there with me and don't go away because I'm a little tardy in sharing more creations or ideas.

Wednesday, March 21, 2012

They're Doin' It In South Africa

My friend Art took this photo recently while on a trip to Capetown, South Africa.  

Tuesday, March 20, 2012

Marv's Idea of the Blues


I was pleasantly surprised a couple days ago, when I received a note from my 'old' friend Marv.

He writes occasionally, but most of the time it is to share political crap that is so far right that I have to turn around to read it.

But, I just smile when I read the garbage Marv sends, because he has a great sense of humor and shares some really funny shit some times.  And, besides, he's my friend.

We've been buddies for more than fifty years, although we lost track of each other for a long time.  He was amassing a dynasty of barber shops on the left coast, and I was running like hell on the corporate fast track, to stay ahead of the wave.  Marv cut the best flattop west of the Mississippi!  I could tell some wild stories about our youth, but what happens in the barber shop, stays in the barber shop.

We reconnected a while ago, thanks to my other friend Jim, who recently passed away.  RIP, Jim.

Marv knows I build cigar box guitars, and a short time ago he asked me to create a guitar for his grandson.  I guess that got him to thinking about music, 'cause in his recent missal, he shared a poem that will soon become the lyrics for my latest blues tune.

I goes something like this . . . .

Susie Lee done fell in love,
     She planned to marry Joe.
She was so happy 'bout it all,
     She told her papa so.


Papa told her, Susie gal,
     You'll have to find another.
I'd just as soon yo' mama don't know,
     But, Joe is yo' half brother.


So Susie put aside her Joe,
     And, planned to marry Will.
But, after telling papa this,
     He said, 'There's trouble still'.


You cannot marry Will, my gal,
     And, please don't tell yo' mother.
But, Will and Joe, and several mo',
     I know, is yo' half brother.


But, Mama knew and said, my child,
     Just do what makes yo' happy.
Marry Will, or marry Joe,
     'Cause, you ain't no kin to Pappy!


Thanks Marv, you da blues lyrics maven.

Will I Live To See 80?


I recently visited my primary health care doctor.  After exhaustive lab tests, he proclaimed I was doing 'well' for my age.  I just turned 71.

A little concerned about his comment, I couldn't resist asking him, "Do you think I'll live to be 80?"


He asked, "Do you smoke tobacco, or drink beer, wine or hard liquor?


"Oh, no!", I replied.  "I'm not doing drugs, either!"


Then he asked, "Do you eat rib-eye steaks and barbecued ribs?"  I said, "Not much!, my former doctor said that all red meat is very unhealthy!"  "Do you spend a lot of time in the sun, like playing golf, boating, sailing, hiking, bicycling?"  "No, I don't", I said.

He asked, "Do you gamble, drive fast cars, or have lots of sex?"  "NO!", I said.

He looked at me and said, "Then really, why do you even give a shit?"

Tuesday, March 6, 2012

Slide Jig

For those of you who are inclined to make your own slides, this jig is the ticket.


Jan Westphal shared the idea on Cigar Box Nation, and I was so blown away by the simplicity of the construction, I had to share it with you.

********

John suggested I post this jig in "Special Tools" so here it is. Its just two pieces of wood joined by two hinges (?) and two brackets* to hold the Dremel. The cut off whell is a diamond coated 1.5" one. The bottle rests between two pieces of metal glued to the wood and the clamp at the right hand side holds everything on the table and functions as an end stop for the bottle, sort of.

I thought it helps to wrap cellotape around the bottle neck to prevent from too much chipping but it is still necessary to take lots of time and dont rush it - I need about 5 minutes for one cut - turning the bottle all the time and taking it very slowly with some nice laidback music in the background. If I press down too hard little pieces of glass are coming off which results in awful lot of grinding afterwards.

*can be found in hardware stores, used to fix water pipes onto walls

Tuesday, February 28, 2012

'Sweet Tater Pan''

I have this nasty habit of plowing around through my wife's silverware whenever I need a special piece of hardware for a guitar.  I've gotten away with 'borrowing' a spoon or two for tail stocks to hold strings, and the cake server I used for the tail stock on my bass 'Gutshaker' almost got me a hospital stay.

I didn't want to push my luck, so I made a visit to my favorite secondhand store in Delaware to see what they had in the form of silver plates or bowls that would work for a guitar body, and I found an honest-to-gawd Rogers silver plated serving bowl that is beautiful . . . for four bucks . . . I'm happy, my wife's ecstatic, and my doctor's missing the opportunity for a payday.

The 'Sweet Tater Pan' is a semi-hollow body, neck-through, four-string electro/acoustic with walnut neck, maple fretboard, silver plated serving bowl body, laminated poplar and maple upper body, paint can lid resonator, and walnut tail stock.

This was really a pretty simple build.  The most labor intensive part was shaping the upper body resonator enclosure.  I chose to make a circular, 3/4" wide, ring out of poplar, which is covered with a sheet of maple.  The edges were rounded over for a smooth appearance and feel.   Once this piece was finished, the pan was attached with small screws, to complete the body of the guitar.

I chose a rounded shape for the headstock to compliment the the body, and incorporated into the design a Montana centennial quarter I found by accident in my pocket.  Just a little item to personalize the guitar, since I'm a native Montanan.

Instead of using the usual hardware for sound holes, I chose to design and cut a matched set of 'f'' holes into the surface.  The circular paint can lid works well for a resonator, and it's readily available at the local paint store.  The 'club'-shaped bridge biscuit is made from Spanish cedar and maple with enclosed Piezo transducer pickup, and it floats on the lid.  The final artistic touch is the wood burned vine surrounding the resonator and sound holes.  The nut and saddle are Corian.

Sound resonates very well when played acoustically.  I expected the tone to be a bit 'tinney', but it is smooth and solid.  And, it is really sweet kicked through an amp, thus the name.


Monday, February 27, 2012

All A Fella Needs to Know About Having Stones

Passing a kidney stone is not quite as simple as the old kidney dropping them by the sack full.

Leading up to my birthday, I celebrated last weekend with a great dinner with my son and family, topped that off viewing a superb stage presentation by the Peking Acrobats.  Life was good.

Then things started going to hell in a hand basket..

Monday last (my birthday) no less, I commenced to feel sharp pains in my lower abdomen, not my back where kidney pain is supposed to originate.  Being the anti-sawbones guy that I am, I suffered through what I thought was minor indigestion.   It persisted throughout the night and into the next day.   I had had enough of the deal, so off we went to the hospital emergency room for treatment.

Have you ever been to an emergency room?  No?  Well, do yourself a favor and call your rancher buddy and have him shoot you, it will be less painful!

We arrived Tuesday at the ER at eleven o'clock (p.m.) and I was whisked in right away for an EKG and blood work.  Wow, this is going to be good.  But, that's where things started to break down (not my kidney stones, though).  After being sent back to the waiting area, where kids were screaming, parents whining, sick folks moaning, and waiting patients bitching (why do they call them patients?  (There is nothing patient about most of them.)  I waited, and waited, and waited.  Finally, after several hours, the pain subsided, and I said to hell with it, and left the ER.  We got home at three in the morning.

I didn't realize this is the nature of kidney stones.  They move just enough to fool you into thinking that things are improving, when all of a sudden, they stop the journey and all hell breaks loose, again, and again, and again.

This persisted until six o'clock Wednesday evening, when I once again headed for the ER.  This time I waited to be seen -- at midnight, no less.  More kids, parents, sick folks, and 'patients'.  Finally, I saw a doctor, and after enough poking, probing, Xrays, and CT scans, he decided I had a 4mm kidney stone (isn't that a comfortable looking little critter?) lodged in the plumbing and that it would pass at some point.  He juiced me up with an injection of Morphine, and sent me home (at five in the morning) with a saddlebag full of other stuff, from Flomax to Hydrocodone.  As long as I stayed medicated, I was good to go the four-hundred meters, but the stone, she did not pass.

Fortunately, I had a regular Dr. appointment on Friday morning.  I went in feeling as shitty as I did Monday, and my sawbones took one look, called his urology buddy and within a couple hours I was back in the hospital being prepped for surgery.

A nurse told me to undress completely and put on the gown she tossed at me.  Geez, that was a hoot!  She said,  "the ties go in the back".  Well, it was a little small and my ass was well exposed whenever I stood to walk, but that's probably better than if I'd have tied it in front.  So much for maintaining dignity in the hospital.

If the pain of the kidney stone was not enough, the doc ran me through the whole surgical plan.  He was going to go in through my peepee with a lighted wand all the way into the kidney to take a look around and to determine what he would do next.

GAWD!  Isn't that enough?

If he could, he would remove the stone, but in any case he was going to insert a stint (a perforated wire) with curleeques on the ends, into the tube between the kidney and the bladder (where the stone had taken permanent residence) so that fluid would drain properly.  OK.  Then it dawned on me that the wire (the thing in the photo at the right) was also going in through my peepee.  MY GAWD, what next?!

Well, I hit the table and once I regained my senses and the pain was gone, I realized how bad it really hurt.  I think a person adjusts to the pain and doesn't realize after a while how intense it really is.

The stint must be removed at some point!  Oh, No!   And guess what, it went in under general anesthesia, which was painless, but he announced that it will come out in his office, while I'm awake.  But, I get a little Lydocaine squirted up there to lessen the pain.

My gawd, is this torture or treatment?!

I Miss You Buddy!

James "JD" Dalbec

| Visit Guest Book

James L. "JD" Dalbec, 72, of Great Falls, died of natural causes Wednesday, Feb. 22, at Benefis Health System.

Cremation has taken place and graveside services will take place at a later date. Schnider Funeral Home is handling arrangements.

JD was born Aug. 11, 1939, in Butte, to Vernon and Elaine (Collins) Dalbec. He attended school in Lewistown, Great Falls and Shelby. JD was a pitcher with the American Legion Baseball All-Stars and attended Brown Institute in Minneapolis, Minn. He served in the U.S. Army from 1957 - 1962.

He worked in radio in Libby, Anaconda, Shelby and Great Falls, and in TV in Great Falls. He was a sports fan and active in organizing the Steinhaus softball tournaments for Special Olym-pics.

JD is survived by his brothers, Joe (Geraldine Gunlickson) Dalbec of Miles City, and Keith (Patricia Nichols) Dalbec of Hendersonville, N.C.; sister Maryann (Greg) Axtman of Can-yon Ferry Lake; special uncle and aunt Floyd and Floy Collins of Butte; nieces Shannon of Miles City, and Kim Claasson of Boze-man; nephews Richard Pacot of Billings, Tim Dalbec of Parker, Colo., Dustin Axtman of New York City, Darak Axtman and Marchelle Springer of Bozeman, and Ashley Axtman of Missoula; eight grandnieces and nephews; and many cousins.

Memorials are suggested to Montana Highway Patrol Hope Project, PO Box 5927, Helena, MT 59604.

Condolences may be posted online at www.schniderfuneralhome.com and/or www.gftribune.com/obituaries

Sunday, February 12, 2012

CBG Tools -- Set Up Your Shop

Purists will tell you the only 'real' way to build a cigar box guitar is with hand tools.  Progressive builders like  the speed associated with the use of power tools.  And, then there are the moderates like me, who think a combination is the way to go.  It is really up to the person creating the instrument, and in my opinion there is no right or wrong way, which conforms to the 'no rules' approach to our hobby.

My shop is small, so a tool combination fits my environment well, especially since it is a materials storage and assembly area as well.  I've found that bigger isn't necessarily better.  I'll share with you the list of tools I find suitable to my builds.  It's not all inclusive, because it isn't necessary to list every screwdriver, clamp, pliers or cutter, or special tool . . . those items come as the result of individual creation and imagination.  So, let's get started.

HAND TOOLS

Files and Rasps -- The basic styles for me are flat, half round, and rat tail, in a variety of sizes. I like them for shaping necks and finishing any openings I cut for sound holes, etc.  Rasps allow fast removal of material, and files work for the removal stage prior to sanding.

Sanding Blocks -- Necessary for preparing all surfaces for final finish.  And, specialty blocks made for shaping fret boards make that job a lot easier.

Chisels -- Come in handy when shaping necks, finishing electronic part cavities and neck pockets.

Spoke Shaves and Block Planes -- Useful for shaping and leveling surfaces.  A variety of block plane styles are available for rough work or final preparation, and spoke shaves work well for dressing the back of a neck.

Hand Saws -- I often use hand saws in my builds.  A back saw and miter box for trimming pieces to the proper length.  An Xacto saw for fine work that larger saws just do not accommodate.  A special fret saw for cutting the slots in the fretboard.  And, a coping saw for the fine opening in the top for sound holes.

Knives -- There are a number of occasions when a knife will do the job another instrument just cannot do, such as cutting cardboard templates.  A utility knife, various Xacto blades, and my pocket knife come in handy on my bench.

Screwdrivers -- Don't forget to arm yourself with a variety of screwdrivers, both large and small, and of various point styles.  You'll need the variety for everything from tuners to tailpieces.

Squares -- Three tools that I use often are the adjustable square, the engineer square, and the adjustable bevel gauge.  They are great for marking saw cuts and for determining headstock angles.  And, you'll find a dozen other uses when you get started on a CBG.

Drill Bits -- You will find that a broad variety of bits in many sizes are necessary.  You will want a set of pilot point bits for general drill work; brad point bits for tuner openings and fretboard inlay, because they cut nearly flawless holes; Forstner bits for cutting holes that require a flat bottom and for removing wood initially from pickup and pot cavities, before dressing the openings with a chisel; and spade bits for work that does not require a precision cut -- I don't use these often, but there may be a time when you find them helpful.

Mallet -- I recommend the use of a small mallet (rubber or rawhide), whenever you are using chisels, or when you may be tapping hardware into position.  Avoid using a hammer on your delicate work for obvious reasons.

Whetstone -- It is critical that bladed tools are kept sharp, and the best way to do this is by using a large (3" x 8") fine-grade stone, which sets securely in a wood tray for protection from damage.  You can build the tray out of scraps, if the stone does not come with it.  Numerous websites explain the proper manner for sharpening various tools.

Scratch Awl -- Use a scratch awl to make a depression at the exact points where you wish to drill holes.  The small opening in the wood will act as a bit guide to assure accuracy.  Also, use the awl for marking around templates which will serve as guide lines for sawing.

French Curves -- French curves, triangles, circle templates, and straightedges, are an essential part of your tool cabinet.

Straightedges -- Straightedges in a variety of lengths, are necessary for obvious reasons.  The funky other tools will be priceless when you start applying the really cool designs floating around inside your head.

Pin Reamer -- A pin reamer is used primarily to shape the holes where strings are inserted into an acoustic guitar bridge and for the strap button, but they can also come in handy for other applications, like enlarging tuner holes, etc.

Caliper -- Using a digital Vernier Caliper is the most accurate way to measure thickness and depth of a hand carved neck.  And, there is no better way to determine accuracy for precision drilling.

Clamps -- Essential to all aspects of CBG building, and never enough of them.  My favorite is the quick grip, but I also use spring clamps in a variety of sizes.  Use them for clamping stock on the drill press platform; attaching fretboards to necks; firmly holding rough-cut necks to the bench while doing rasp and file shaping; and a variety of other times when an object must be temporarily held in place.  C-clamps can be used, but they are too awkward and bulky for me.


Third Hand -- This claw-limb assistant is a must when soldering wires.  The arms are adjustable and easy to use.  I don't use the magnifying glass, but I suppose there is something that it will come in handy for.  I can attach it to my portable guitar assembly table with a carriage bolt, washer, and wing nut, whenever I'm soldering small parts and put it away when not in use, which make it the best four bucks I've ever spent at Harbor Freight.


Vice -- There are a variety of vice shapes, makes, and descriptions out there, which can add to the confusion, but I recommend a couple which will make your life enjoyable and easy.  A basic bench mounted adjustable 4- or 6-inch metal jaw vice will do well for most metal and rough wood work, but when stabilizing guitar bodies, necks, etc., you will want something designed for that purpose, so keep that in mind.  But, the vice you will find most useful  is similar to the illustration to the right.  It has larger and more narrow jaws to accommodate the sharp file angle necessary in shaping nuts and saddles.  I found mine at Stewart-MacDonald.

Nut Files -- These are specialty tools designed to make grooves in nuts where strings ride.  They come in a variety of sizes for the purpose intended and are available at suppliers like StewMac.

Fret Tools -- These tools and materials are also specialty items designed to make the job of fretting a guitar an easy and rewarding experience.  A complete inventory of tools and parts needed in the effort is available at Stewart-MacDonald.  Pick up their catalog, or give them a call for any assistance in determining your needs.


Respirator -- You will be creating a great amount of wood dust,which is extremely dangerous to breathe, so while you're doing this, you should be wearing a respirator.  The little white cotton masks are good for preventing pollen from getting inside your lungs, but they are not adequate for dust and fumes generated in the process of woodworking.  So, invest in a good quality mask with replaceable filter inserts.  You, your family, and your doctor will be pleased.


POWER TOOLS

Drill Press -- A drill press is essential for my shop.  It is not only the easiest and most accurate way to drill tuner holes,but after I added a larger platform with an adjustable fence, it became a rotary sander whenever I need to finish the edge of longer pieces or the edges of sculpted headstocks, etc.

Soldering Iron -- I use two types of soldering irons.  One is the conventional 30w wand, and the other is an adjustable wattage 'pencil' style that can also be used for wood burning images into my creations.  If you need my thoughts on soldering, please see the 'How To' post on this site.

Table Saw -- I don't use my table saw a lot, but when I need to rip a larger piece of lumber into neck stock, or cut scarf joints, it works for me.  Purists would say that hand saws are to only way to go, but for me the easy way is the best and most accurate, especially with the scarf jig I made.

Band Saw and Scroll Saw -- I use each of my specialty saws all the time, and I cannot imagine trying to cut sculpted headstocks or sound holes any other way.  And, when cutting nut and saddle stock, bridges, etc., the scroll saw is the perfect.

Hand Drill -- Although I use my drill press for nearly all the basic needs, there are times when my hand drill does the job efficiently, and it is essential to my tool chest.  I like it because it is small and easy to handle, but because it will accept a 3/8" bit shank, so I'm not confined to just small bits.

Belt/Disc Sander -- My bench model works great for shaping and smoothing pieces prior to the finish step.

Planer -- The bench planer is the tool that provides the versatility to be able to custom cut stock to the thickness desired, without wasting time searching suppliers for the inevitable 'lost cause' that just isn't available in mass produced lumber for box stores, and/or neighborhood lumber stores.

Router -- I don't use my router a lot, but when I need it to open or dress cavities in a solid guitar body or to carve out a channel for a truss rod, it is necessary to have around.  And, the way I have it set up, I can use it either as handheld or table mounted.

Dremel Tool -- Because of its size and available attachments, the Dremel tool is the handiest little gadget in my tool box.  Although, I like to do most of the finish work by hand, the Dremel allows me the option to do things the easy way, if I get lazy.  The investment can be a bit pricey if you go with the 'big' model, but you can get by nicely with a basic version, and add only the attachments you will 'really' use.
Vacuum -- A broom and a dust pan will work, but the minimal investment in my ShopVac is the best use of forty bucks (on sale before Christmas at my local retailer) that I can think of . . . aside, from a couple cases of Heiniken.  It makes cleaning up a mess about as enjoyable as it can be, and it makes my wife tolerate my hobby a lot more than the days of the broom.

Thursday, February 9, 2012

Neck Strap

I mentioned that when I was shopping at the secondhand store, I spied a really cool item for a neck strap.

It looks like a belt some hippy chic may have worn, before she exchanged it for cash, etc..  If so, she would have been the local moonshiners delight when she waltzed into the bar with this baby strapped around her midriff.

Not designed or nearly long enough for a guitar strap.  After polishing the chrome and stainless pieces, I added the notched leather straps at the ends, which fit securely over the buttons on the Crapocaster.  And, it's just outrageous enough to fit the theme perfectly.

The 'Whoopin' Stick''

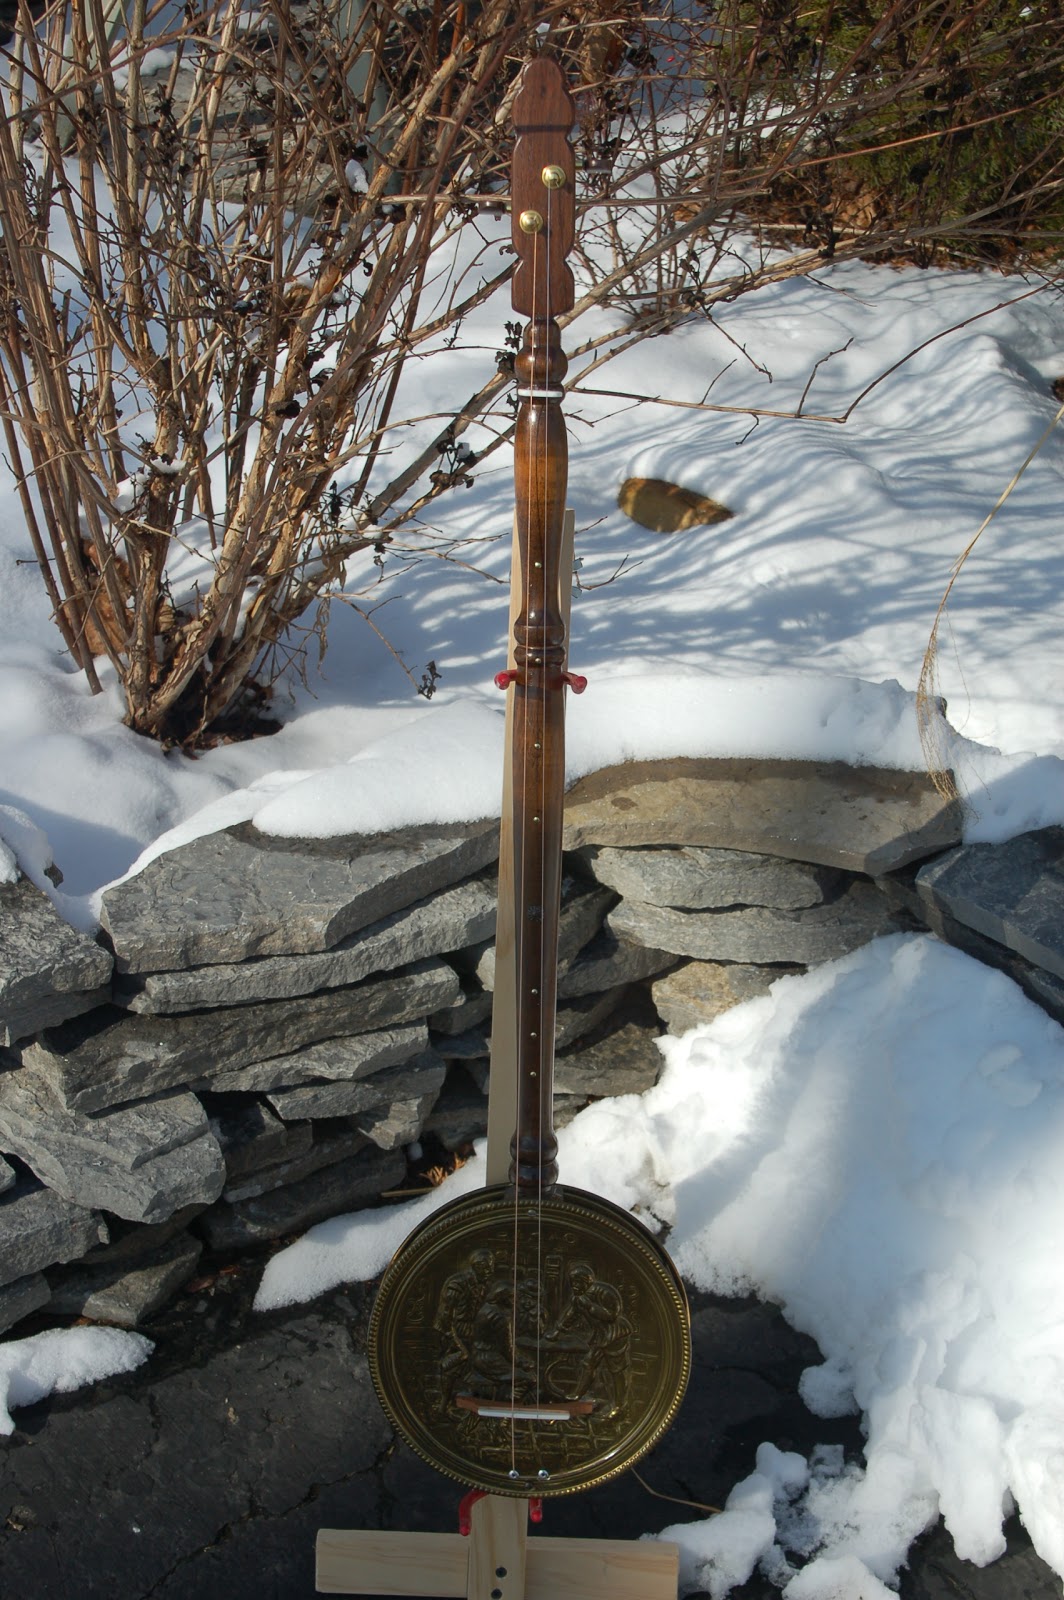
I saw a photo several weeks ago of a bed warmer turned into a single-string instrument.  It was a pretty crude example of what I thought could be a really interesting 'allmosta guitar', so I started looking around for a similar item.  My exploration took me to Craig's List first, nothing there, so I was off to eBay, where I found several, all in England, but the cheapest was $35US, and I'm not paying thirty-five-bucks for a brass can someone sticks hot rocks in to warm the sheets . . . that's more than some hookers were getting at the Superbowl to warm a bunk . . . which the nuns from Cleveland were talking about in their quest to save young women from creepy 'ol men.  They were probably as successful in their game as the Patriots.

Browsing around a junk shop in Delaware (that's Ohio) last week, I discovered one of these nifty little things.  It is brass with a curly shaped handle, really a half-handle, in that it was only a half-inch thick and rounded on one side only . . . weird, but if you've been to England you can understand . . . they have some strange customs, like driving on the 'other' side of the road, and calling french fries 'chips' . . . geez, no wonder we won the war.  Otherwise, it was really cool looking.

I bought the thing (for two bucks --- that's $2.00).  Gawd, I love America!  Beat feet out of the place and for the next 45 minutes driving home, a plan emerged from inside my ghourd.

After unscrewing the brass can from the half-stick, I glued the stick to a walnut neck blank I use for my other guitars.

When the glue dried, I commenced to fit and shape the laminated neck to match the original design, but the headstock needed it's own treatment, which was a snap.  It took me a couple hours to shape, rasp, file, drill and sand the neck to the final stage, before a finish coat was applied.  While this was going on, I polished the can to a high gloss.

Once that was complete, I marked the nut and bridge positions, and also the 'key' fret (there are no frets) positions, secured the custom pieces to the 'new' stick, installed it in the can, complete with Piezo pickup, added strings, and voila, I gots me a real two-string 'whoop stick' tuned to open G.

These little brass cans with a stick for a neck are sometimes referred to as Lowebows or strumsticks, but I call mine a 'Whoopin' Stick', as in whoop ass, 'cause it turned out to be really fun to play and it beats hell out of fighting with a slide on a six-string.  I've discovered that I am not that guy, and I never will be.  Besides, that cool vibe should be left to the old Black guys who really know how to make a slide growl.  Us white boys just don't have what it takes.

This turned out so well, I think I'll go back for the other two warmers the guy has.  And, wait 'til you see pics of the cool thing I found for a neck strap at this store.