Tuesday, January 31, 2012

' The Crapocaster'

The suspense is over!  You can now see what I created from the bed pan referenced in an earlier post.


A '50s style unused female bed pan in the original box' was found in a renovated house on Lake Erie, and it became the latest and most outrageous TotalRojo creation to date.  This thing is so damn cool I want to sit on it!  And, it sounds awesome through my amp!

A Fender Stratocaster neck, complete with tuners and string trees, is attached to a support beam with screws from the under side, just like the real deal, but they are hidden from view.  The support beam is attached to the pan body with one visible bolt in front under the neck, and this is designed to serve as a strap knob as well.  That's it, no other visible attachments.  However there are two screws supporting the back of the beam to the pan body, but they are hidden under the bridge.  Adorning the neck is the hand painted Crapocaster logo visible in the photo.

The shape of the pan lent itself to the unique design for the custom poplar wood scratch plate, which covers the opening of the pan.  This turned out to be a really neat mini-guitar shape, which compliments nicely the over all guitar body design.  It is attached to the main beam with screws hidden under the bridge as well.

All controls (single coil pickup, volume pot, tone pot, and output jack) are recessed into the underside of the scratch plate.  A custom designed pickup enclosure was crafted from a discarded piece of Spanish cedar that came from one of the cigar boxes I used for a guitar some time ago.  I keep all that stuff for future use, and you can see it comes in handy.

A Fender-style solid body bridge is attached to the scratch plate, hiding the attachment screws referenced above, and the bridge/string ground wire from internal electronics . . . gotta have that to eliminate hum from the amp.

I received a complimentary set of SIT (Stay In Tune) Power Wound extra light strings a while back, so I strung those on to see how they perform, and they are great.  I like the lighter gauge strings on my guitars, 'cause there easier for my old fingers to move around.

And, last but not least, are the hand painted flames on the back of the pan.  Base color of the flames is vermilion with a darker rust outline and with blue-green accents on the tips to make them come alive.  I liked the clean look of the bare white pan, but I just had to lay down a few lines of flames to set this thing afire.

I hope you like it.

'The Triangle'

A San Latano Requiem Maduro cigar box has become the body of a really cool three-string electro/acoustic slide guitar.  I chose a full fretted red oak neck and maple fingerboard for the strings to dance over.  A walnut laminate covers the headstock scarf joint, and Corian serves for the nut and saddle.  Because of the inverted bevel design of the box top, the string action rides a little higher than usual to accommodate it.  Black tuners were chosen to compliment the box color.  It's a very basic design, nothing wild or strange, but it works very well with a slide . . . sounds good and fun to play.

Monday, January 30, 2012

What This May Become?

Just the other day, I was searching eBay for unusual objects and I ran across this old bed pan.  It was offered for sale by a lady from northern Ohio, up by Lake Erie, who during remodeling an old home they bought, found this little beauty unused in the original box, from the fifties.

"What in hell will I do with a bed pan", I asked myself?  Besides, it didn't have the ol' penis pipe that you see on most bed pans.  That's because it for a female, my wife informed me.  But, it looks a lot better without that goofy thing sticking out the back, or is it the front?  Who cares, it sticks out, that's what I do know, and it doesn't look too cool.

All kinds of application possibilities were floating around inside my gourd when I saw this thing, so I had to have it, and for $4.49 it was areal bargain . . . have you ever priced these things on the retail floor?  You can piss away fifty bucks in one pass.  No pun intended.

What could this become?

It could be a hard hat for Newt.  Perhaps a soup bowl for Mitt.  How 'bout a brandy snifter for the Governor of Arizona, (if shes even knows what brandy is, those desert dwellers think Grand Marnier is Joe Arpaio)?  Maybe a tea pot for the Tea Party.  What about a yacht for Ron Paul, so the old buzzard can sail out of our lives?  Geez, the possibilities are endless.

But, I got an idea that will knock your socks off.  So, stay tuned and I'll share it soon.

Sunday, January 29, 2012

Design & Decoration -- 'How To' for Cigar Box Guitar

Limitations associated with decoration for your CBG is in direct proportion to the expanse of your imagination . . . there really are no limits.

I will offer some suggestions for you to expand on, but if you really want to get a feel for what others are doing, go to http://cigarboxguitarsaustralia.ning.com/.  The folks down under do some of the most outrageously cool designs you will lay an eye on.

So, what elements make up the basic CBG decorating possibilities?  Not much that will get in the way of your creativity.  And, some of it is optional.

*  Headstock
*  String trees
*  Neck
*  Fingerboard
*  Cigar box body
*  Neck cavity
*  Sound holes
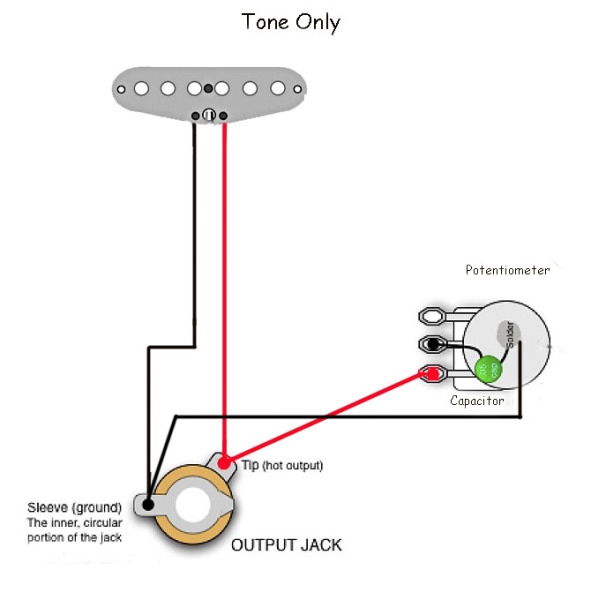
*  Magnetic or Piezo pickups
*  Control knobs
*  Bridge & saddle
*  Tail stock string retainers
*  Resonator

Let's take a shot at items on the list, to see what design possibilities we can come up with.

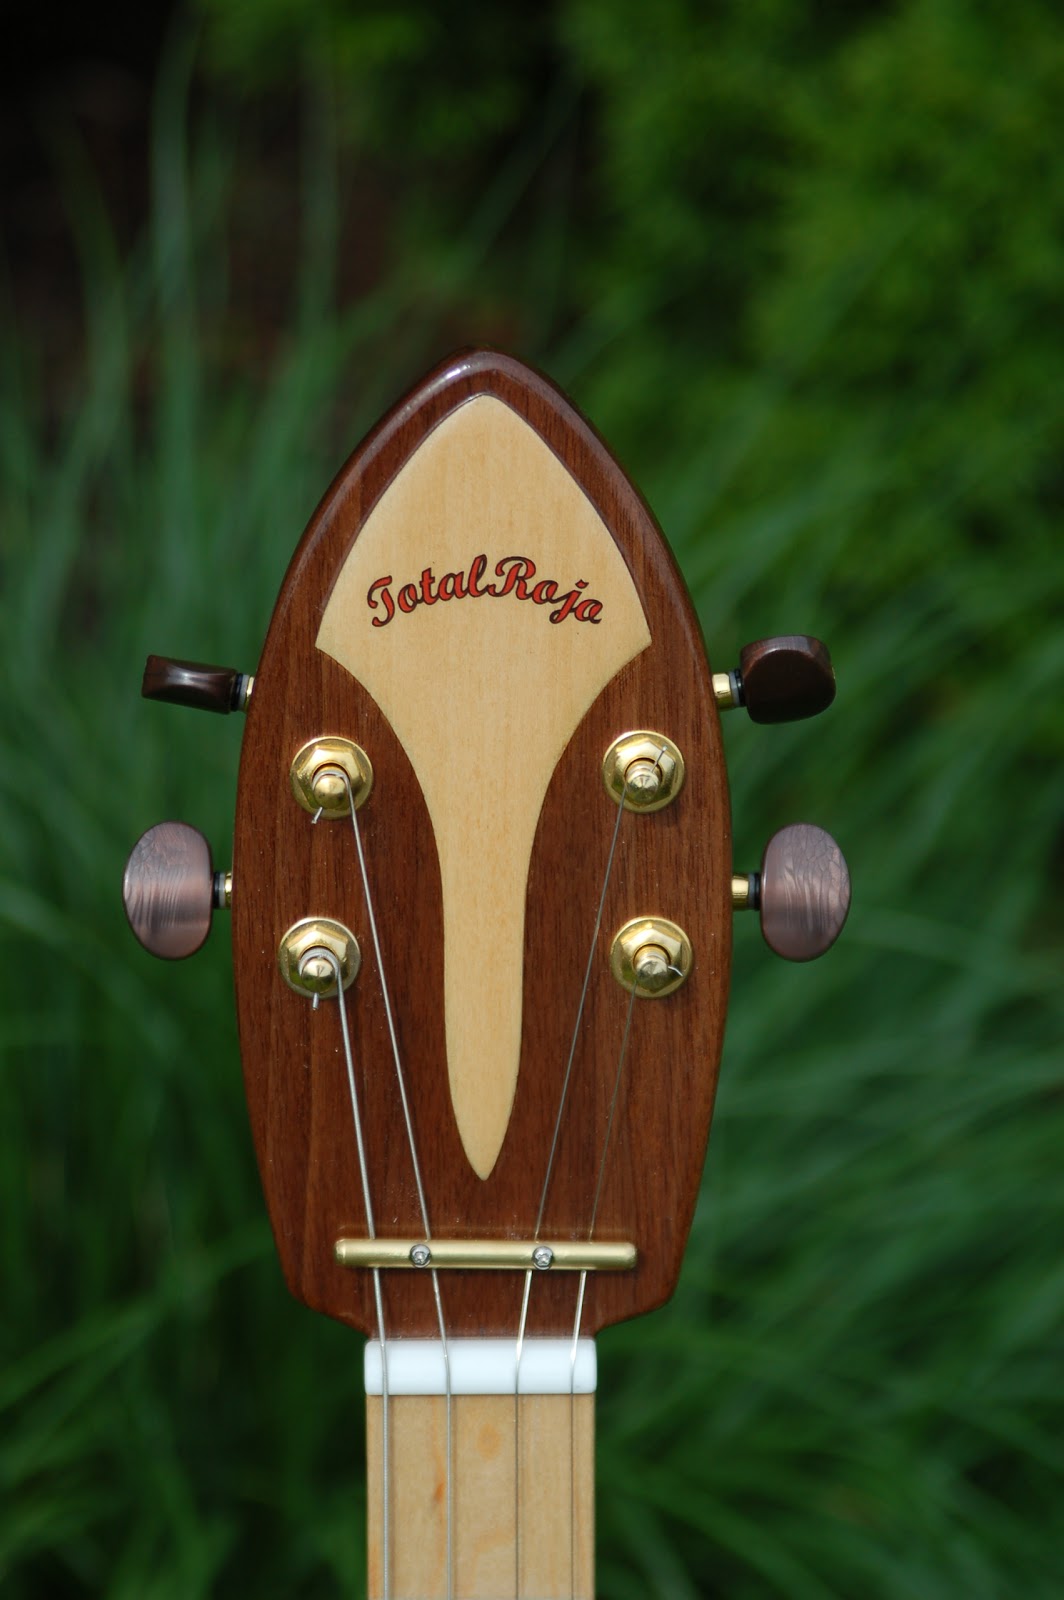
Headstock -- The shape is usually an individually desired design, which looks good to the builder, and is only limited by size and tuner placement.  It can be left plane without ornamentation, stained or painted, wood burned, or laminated
with wood, paper, plastic, etc., to individualize it.  And the lamination can be in to form of artwork, logo, veneer to cover a scarf joint, etc.  Small geegaws can be glued to the surface or inset to enhance the design.  But, whatever you do, try to incorporate the headstock design into the overall guitar design, because the finished guitar will just look better.


String trees -- Trees can be in the form of commercially available pieces, or they can be the builder's own design.  But, they can be made to look really cool on a headstock, as well as to be an effective way to keep the strings on the nut on a straight-neck guitar.  Trees can be made from metal, wood, plastic, bone, or whatever else you as a builder finds acceptable.  Use your imagination.

Neck -- The neck and headstock are obviously one piece, but the neck can be decorated as well.  And, it can be shaped to fit your overall design.  Will it be a through-body design or a bolt-on neck?  Will you want it sculpted to feel slick when being played, or left with hard edges to give it a more rugged, funky look?  Will is have a 'skunk stripe' to emulate some of the factory jobs?  Will it be painted, stained or left a natural color?  However you decide, try to once again keep the overall design in mind.

Fingerboard -- Will it be fretted with the real thing, or will fret positions be marked with a line?  Either way, a design can be inlaid, painted or laminated on the surface, or burned into it with an iron.  The design can be as elaborate as you want it to be, or it can be as simple as fret position marks only.

The box -- All surfaces on the box can be used for special design, or the box can be left plain.  But, whatever you decide is once again limited only by your creativity.  So, let your imagination wander, or steal an idea or three from someone else's rig . . . don't worry, they got the idea from someone else, too.  You can paint the box; glue on pictures or photos; apply decorations; add enhancements to change the shape;  or you can step away from the cigar box and use something unconventional to make your creation stand out . . . how 'bout and oil can, and ammunition box, a toilet seat, or a bed pan?  That aught to get your neighbors and in laws talking.


Neck cavity -- This is the opening on the leading side of the box, where the neck is inserted into the box.  It is important to think about this when cutting the opening.  You want it to look good, not just to be a hack job.  And, even the most carefully cut opening can be enhanced with some form of decoration to surround it. Again, the design possibilities are endless.

Sound holes -- These are the openings in the box top, which are not only cute, but they are functional in that they let the acoustic sound escape the confines of the box.  So the design should be carefully considered, not only to look good, but to function, too.  They can be as simple as drilled holes left open; holes covered with metal decoration; screened from underneath; or as complex as openings designed so that small files and saws must be used to complete the design.  Keep in mind that bigger is not necessarily better, when designing sound holes.  Sound will bounce around quite nicely from a couple holes the size of a half dollar in the top of the average size cigar box.

Bridge and saddle -- I've used wood, brass rod, bone, plastic, metal objects such keys, and Corian (my favorite nut and saddle material), and I know others who have used bolts and other stuff for saddles, so whatever you decide will be OK.  If it doesn't work for you, you can always do it over . . . 'cause we have do-overs in this hobby.  I like to shape wood for the bridges on my builds, but you may find that something else works better for you, so go for it.


Tail stock string retainer
The string retainer on my bass, the 'Gutshaker' is 'borrowed' from my wife's silverware collection.  Well, what's a fella to do when he needs a special part to complete a CBG build?  She was looking for it the other day, but I didn't have the courage to tell her it was now a piece of art on a guitar.  It worked out perfect for what I had envisioned.


Resonator -- You can purchase a 'real' resonator, or you can get creative, it's your choice.  But, for a CBG, I like the more imaginative approach, such a using a tuna can, a paint can lid, a license plate, a vintage hubcap, or my dog's stainless water bowl . . . the dog might get pissed, but a man's gotta do, what a man's gotta do, right.

___________________ 


Following are a few more photos, which will show you the many possibilities for creating a really cool and playable instrument.  The thing to always keep in mind is that, "There is no right or wrong" way to build a cigar box guitar.


If you want to see more photos of my guitars, go to the right-hand column of my blog and scroll down to the images under the 'TotalRojo' sign, and click on any of the images and it will take you to the full explanation of each guitar, with added photos.

I hope what you have experienced here will be helpful to you.  If so, let me know.  And, you can follow my site for future information, just click on the 'follow' button at the top of the home page.

Thanks for viewing!

Tuesday, January 24, 2012

'The Torpedo'

Sandusky Street in Delaware, Ohio is the home of at least three very nicely organized and stocked antique and secondhand stores.  And, one of those stores is where I found an old, really cool, cigar box, which has become 'The Torpedo', a three-string electro/acoustic guitar.

It is a Fabrica deTabacos de Hupmann box made in La Romana Dominican Republic.  The Spanish Cedar dovetail joint construction of the box makes it a sturdy resonator for a guitar.

The headstock on the cherry neck is a scarf joint design that has zebra wood laminated to the top to cover the scarf joint.  Corian nut and saddle enclose the 25.4-inch scale maple full-fretted fingerboard.  Sound holes in varying sizes and design open the top of the box to allow sound to bounce around, and a Piezo transducer pickup installed under the bridge transmits sound to an amp.

The Torpedo is tuned G-D-g, like most of my guitars, and it sounds very nice acoustically with a strong growl resonating from the box.


'Red'

I found a red LaGloria Cubana Series N cigar box at my favorite cigar shop the other day, which I was sure would make a perfect amp.  So, off I went with the thing tucked securely under my arm, with numerous images dancing around in my skull.

Back at my shop, it took me about 20 seconds to noodle a design, and out came the drill bits, Xacto mini saw,  a couple files, and my favorite MAH3 GuitarFuel harness.

The speaker openings are simple holes drilled with varying size Forstner bits, in a circle on the back of the box.  Rubber feet are from the local hardware store, along with the handle, which is a cabinet pull.  On/Off, Volume, Tone and Overdrive controls are on the upper right side, and Input jack, AC adapter plug, and ear bud jack are located below the controls on the right side, for convenience.  The front of the box slides open to reveal the inner workings.

This little gem took me about an hour to complete, and to test drive on one of my guitars.  Like usual, all the controls worked perfectly, and it sounds good to boot.

I named it 'Red' for obvious reasons.

Sunday, January 22, 2012

Amp Building -- 'How To' for Cigar Box Guitars

Building a cigar box guitar amplifier can be as simple or as difficult as you choose to make it.  For me, the more simple route suits me best.  I'm not an electronics wizard, and I'm not into creating amps from telephones and transistor radios, so I like to use a cool cigar box for my enclosure and a ready-made wire harness, which I know works.  Perhaps, if I could find well-defined pictorial directions, I would convert my old tape recorder into an amp, but I haven't found that yet, so here is my idea of a good time.

1.  I get out the proven-to-be-good GuitarFuel wire harness, from my supply inventory.  If I'm not interested in using an AC adapter with my amp, I choose the SD-2W harness.  It's easy to install, and it works great.  If I want a little more from my amp and the convenience of plugging it into the wall, it's the SD-MAH3 for me.  In my opinion, the GF harness is the best available.  It may be a couple bucks more than some of the others I see on some of the web sites, but the quality is top notch, and I don't have to screw around with anything . . . it comes to me ready to install.


 SD-2W

2.  Next, I select the cigar box I want to use for my amp . . . and, my selection might be something other than a cigar box, if I find something so unique that I cannot live without it, such as a vintage radio.  But usually it's a cigar box.  The box must be large enough to accommodate the harness, and speaker of choice.  My favorite is the 'Acid' box, but, I have a drill press and Forstner bits, so I can drill the necessary holes deep enough to accommodate the switches and plug connectors.  The sides and front of the Acid box are much thicker than many other possibilities.


3.  While I was doing #1 & 2, I was also thinking about the design, and now I'm ready to move forward.  Where will the controls and connectors be located?   What about the sound hole opening over the speaker?  What other special items to consider, e.g., handle, knobs, latch, feet, graphic application, and etc.  The controls should be easily accessible and the speaker opening should be in an area that pumps sound toward your audience.  You can make a control location template, which will make your job easy.  However, changing things around gives originality to your builds, so you may want to forego the template idea.  And, the harness leads are long enough to allow for any possible location idea you may have.

That's about as complicated as it gets.  So, grab your tools and go to work . . . all you'll have is fun.

Following are some design ideas you may find useful.


And, for a closer look at the detail of the amps I build, please go to the right hand column of the home page, scroll down to the 'amplifier' logo, and click on any picture to be taken to the post explaining the build.

I hope this tutorial has been helpful and inspirational.

Sunday, January 15, 2012

Wiring -- 'How To' for Cigar Box Guitars

Wiring pickups, jacks, switches and potentiometers into your cigar box guitar is pretty simple, if you follow the pictorial guides provided by many of the parts manufacturers and builders.

I've incorporated some wiring options into this blog post for your benefit, and for me as well, so we don't need to catapult around Google looking for the perfect schematic for a particular job.

The grounding of the guitar is the most important thing to do correctly, after you've created good solder joints.  Done right, you can have a well grounded guitar with no shielding, or you can do it wrong and have the worst sounding shielded guitar on the planet.

It is very important to ground your project so that you eliminate 'hum' (although single-coil pups tend to produce a slight hum), while humbuckers tend to be quiet. 

The general rule of thumb is ground all metal parts, and that all ground wires lead to the back of the volume pot, and then one wire is run from the volume pot to the ground lug on the jack, which will eliminate the chance of producing a 'ground loop'.  This means that each component can follow only one path to ground.  If there is more than one path to ground, a ground loop exists.

If you are using shielding tape or foil, and you have more than one component, do not run ground wires between the components (pots for instance).  Doing so will create a ground loop, because the foil acts as a ground in itself.

Most guitar schematics indicate multiple ground symbols throughout the drawing, for individual components.  It is assumed that it is understood that each ground goes to a central location (the volume pot).

If you want more information on grounding and shielding, please access the following link:  http://www.guitarnuts.com/wiring/shielding/shield3.php.


One HB & One Volume


One HB & One volume & One Tone


One SC & One Volume


One SC & One Volume & One Tone


Two HB & One Switch & One Volume


Two HB & One Volume & Two Tone & 3-Way Switch


 Two SC & One Volume & One tone


 One SC & One Volume & Ground to Bridge
(This example shows how proper grounding can eliminate a 'ground loop)


Two Piezo & Two volume & 3-Way Switch & Jack

Standard Tele Wiring


 5-Way Switch


Tele Switch Plate