Monday, September 24, 2012

Montana Time Out

The workshop has been dark for a few weeks.  No guitars on the bench.  No music playing.  No sawdust clogging up the sinuses.  Just a little time out.

Living in the mid-western rust belt (normal rain fall, humidity and cloudy days with no sun) makes one rust, not tan.  Although, this summer has been pretty dry and sunny for a change, so I needed relief from it.

We decided it was time for a change of scenery. We headed west to see the relatives, and to take in the usual tourist attractions along the way.  A fella cannot see Rushmore, the Black Hills, the Badlands, Wall Drug, or Yellowstone Park too many times.

I forget how desolate it is when leaving the rolling hills of Indiana and drift into the flat land of Iowa and points west, which stretch all the way to the Montana border.  But, the one redeeming factor is that for all those hundreds of straight line miles, you drive in a huge blue bubble.  At least that's what it looks like . . . 360 degrees around and straight up forever, it's blue sky.  Geez, it's so cool.  Nothing like it, until you hit Big Sky Country, and then the cool turns to fantastic!

Three weeks of unbelievable weather . . . every day was sunny, temps in the high seventies to mid-eighties, no rain . . . just the big sky to enjoy.  The only downside was the heavy smoke conditions caused by forest fires all around us, but, even with that, it was beautiful.

It's true, "You can take the boy out of the country, but you cannot take the country out of the boy!"  Damn, I miss the mountains of Montana.

Oh, well, as a real Montana native (Blackfoot heritage), I got to live it, while others just get to visit.

I thought my readers may like to see what life in the Big Sky is all about, so I'll share a photo or three to temp you, and to make me homesick once again.

Antelope checking me out

My first wife, of 49 years, Roxie near the top of Bear Tooth Pass.

Atop the Bear Tooth Pass at nearly 11,000 feet.

It's smokey, but it's still beautiful.

This ol' fella was coming over to check out our car on the Bear Tooth highway.  He was just one of a heard of about 400 that stopped traffic, while they moved across.

This is a smoke filtered sunset that welcomed us on our first night 'home' near Yellowstone.

A cow elk taking it easy on the lawn outside the resort hotel at Mammoth Hot Springs.
Life is good in the Big Sky.

Sacajawea Inn at Three Forks, Montana.
Some of the best fly fishing in the world is here, where the Madison, Jefferson and Gallatin rivers join. This is our home on the road.  Quaint, quiet and comfortable, and the restaurant is top shelf.

These little friends greet us for coffee in the morning in our mom's back yard.  How's this for city living?  Tell me Montana isn't cool!

We had to run the deer off to get a shot of the nieces and nephews and their children.

This is a shot of what was my folks ranch at the western foothills of the Bitterroot-Selway range.  It's a little smokey that day, but you can see why I keep Montana in my heart.

If you haven't been out west, this is a good reason to go.


Friday, August 24, 2012

Gotta Have A Cool Guitar Stand

I saw a guitar stand in Acoustic Guitar magazine a while back that I thought would be really cool for a couple reasons -- to keep the guitar off the floor, and to also serve as a perfect place to hang one for photos.  But the price of the advertised stand scared me off.  So, off I went to the wood shop to create my own version of the 'perfect' stand.  What do you think?


It's made from pieces of poplar wood with the legs stained walnut, the main shaft golden oak, and the hanger itself is walnut stained.  Pretty simple build and a helluva a lot less than the price in the magazine.

'Curley'

I've gotten away from creating guitars from cigar boxes the past couple months, but I haven't abandoned that side of my hobby, just got a little distracted.

After 'Bigfoot', I had the urge to do something a little different, but still in the carving realm.  So, here is 'Curley' the latest effort.  Let me know what you think.

It started out as a chunk of bass wood 1.75" x 14" x 22" (again supplied by Art Richey at Carousel Works).


I drew the outline of the body I intended to create, and transferred it to the wood block.  Once that was done, I was on my way.  All the openings and cavities were accomplished with Forstner bits, then roughed out with a small hand saw, rasps, and files.  Final work was done by hand with carving tools, small files, sandpaper, and a lot of elbow grease.


The scratch plate is a piece of really cool looking maple sheeting cut to accentuate the design, while covering the electronics cavity and abutting the through-body bridge and bridge pickup.  Pickup surrounds were made from pieces of scrap Spanish cedar.  Very thin walnut veneer was glued to the tops of the pickups to help them blend into the overall look, I think it looks better than a couple black objects in the middle of the design.  You'll note the shape of the surrounds are angular, while the overall body design is softer and more flowing -- which was by design.  I wanted the contrast in shapes to bring the overall design to life.

I selected a really straight and nice Harmony neck from my inventory, modified the headstock to eliminate the sharpness of the original, and laminated a small piece of walnut veneer on it to carry on the body designs on front and back, tying it all together.

To bring the wood to life, I chose a base stain of golden oak, then washed the non-recessed areas with diluted walnut, and highlighted that with red mahogany to create a little depth in the finish.  Then came six coats of poly, each sanded with 500 sandpaper.

I chose to use neck screws with bushings instead of a large chrome plate to attach the neck to the body so as to not distract from the flame-like carving on the back.  For the same reason, I chose to use small string bushings opposite the bridge.

After 27 hours, not continuous of course, 'Curley' came to life, and she sure does play nice.


Wednesday, August 15, 2012


My wife caught me last night carving on the newest six-string creation.  Since the 'Big Foot' build, an idea has been floating around my head about a full-on carving of a traditionally shaped solid body, but with unique character.  Hopefully, I'll have photos of the finished guitar posted in a week or so.  Until then, you'll just have to wait to see what a honey this thing is turning out to be.

Tuesday, August 7, 2012

The OP Nascar Hot Seat!

A couple years ago, my buddy Bruce talked me into joining the OP Nascar Fantasy League.  It's a collection of more than a hundred die hard Nascar fans, who pick teams and meet regularly at a Great Falls, Montana watering hole called the 'Other Place', thus the OP moniker in the name.

They have some unusual events to gather around, like a 'corn dog' race, where participants build small Pinewood Derby-like cars to race down a ramp at the bar.  The unusual part is that the car must have a 'corn dog' as it's central theme.  Yes! They use real corn dogs shaped and painted in the most gawd awful themes imaginable.  Bruce really gets excited about this event.

So, a month or so ago, Bruce called with a special request.  He wanted me to design and create a 'really cool' toilet seat to be used as a golf hole surround in a tournament they are having at the end of the Nascar league season.  "It has to be funny, but also difficult for the guys to putt through to get to the hole", he wrote.

I put on my weird thinking hat -- not difficult for me -- and came up with an idea I think he'll like.  And the best part -- I'm going to personally deliver it to him in a couple weeks.  But, in the meantime, what do you think of this?

The seat is wood, which I painted black.  To work properly, I cut an opening in the front of the seat portion, which is just a bit larger than a golf ball, so putting through the opening will be a challenge, but that's what the boss wanted.  Pinstriping and graphics are all hand done with 1-Shot sign painters enamel, and then clear coated to protect the fancy stuff.  The flames are sprayed and hand outlined and accentuated.  And, the lettering on the inside of the top is all hand done, as well.

To be functional as a real toilet seat, I left all the attachment parts and spacers in place.  But, to work adequately for the hole surround and to keep it in place in the grass surface of the green, I created threaded pins to screw into the bottom of the seat, which then will be pushed into the playing surface . . . the seat can be arranged in any position over the cup without moving around.  Bruce wanted the seat top to stand upright when on the green, so I fabricated a brass plated plant hanger for support.  It is easily removed, as are the pins, which allows the seat to be used for the 'real deal'.

I think the plan is to raffle the thing off at the event, so some lucky person will have a pretty cool conversation piece for their crapper.


If you just cannot live without a custom toilet seat to adorn your privy, give me a shout and perhaps we can come to an agreement that will give you something really cool to sit on, while you're reading the Wall Street Journal, or something more suitable to the occasion.


Thursday, August 2, 2012

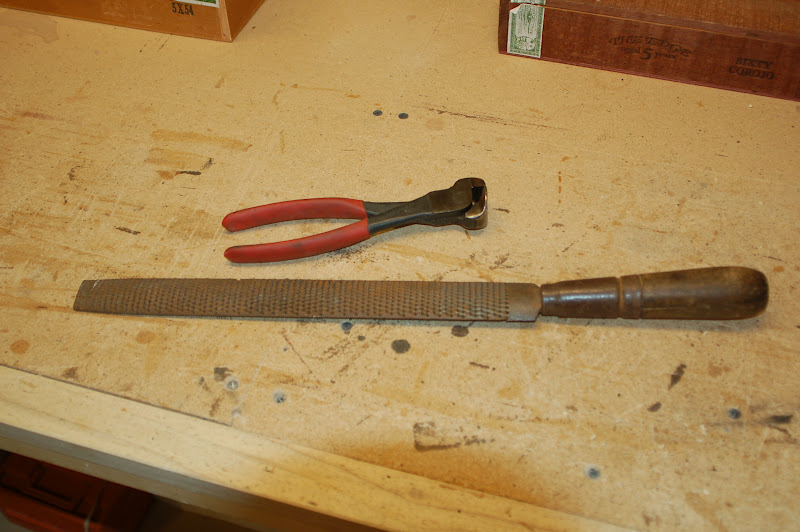
New Old Tools


I've been looking for several months for a 'good' wood rasp (the big box stores have tools, but for the most part they are overpriced junk made off shore), and while cruising around the monthly swap meet last weekend, I spotted this beauty lying among a host of other tools. It's old but like new except for a coloring of surface rust, and the really cool thing about this guy is that it has very small teeth on the edges, which can be used for fine work.  Also, there in the pile was a nearly new edge cutters, which I use for fret work.  And the best part about all of this is both items were made in the USA . . . for $5 each, I think I got a deal.

So, off I went feelin' good to look for more goodies.

A fella just cannot pass up a good tool, and you cannot have too many.

A couple stops later revealed a very cool scratch awl, a really nice adjustable block plane, and a like-new adjustable wrench, again all were made in the good ol' USA.


On my way home from the treasure hunt, I stopped at Menard's for a couple sanding discs, and while looking around, I damn near fainted . . . I spotted a brad point bit set (I wanted to replace the Asian items with better quality) made in Montana of all places.  I couldn't believe it, and I couldn't pass it up, since it's like buying hometown hardware.


Check out the label, it made me all teary-eyed thinking about home.

Old guys get a pass for this kinda stuff, right?


Saturday, July 14, 2012


My friend Jasper Rubenstein created this really cool four-string slide guitar from a couple of Jaguar hubcaps. If you want to get a closeup look at the details of the build, click on this link . . . 


Some guys are so damn creative!

Tuesday, July 10, 2012

Cigar Box Guitars -- Custom Creations For Sale


TotalRojo Cigar Box Guitars is a small one-man operation specializing in one-of-a-kind creations.  

My name is Jess Allred and I specialize in creating unique three-, four-, and six-string electro/acoustic guitars and mini amplifiers.   Most of my guitars are created from modern as well as vintage out-of-production cigar boxes with hand formed necks of oak, maple, cherry and walnut, and no two instruments are alike.

However, I do stray away from the roots of my little shop from time to time to create special guitars made from some interesting items like bed pans, silver serving bowls, toilet seats, and a few other items that can make a great guitar body.

And, I've been known to take my creations to a whole 'nother level, too.  I found an old cathedral-style radio at a swap meet that conjured up the idea in my head that a guitar body shaped to look like the radio would be real cool -- the result was the 'Chief', which, like all of my creations, can be seen on my web site -- http://totalrojoguitars.blogspot.com, if you're interested in having a good time.

There is no mass production assembly line in my shed.  Just me, my tools, and a little blues music.

I don't consider myself much of an artist and I'm not a luthier in the truest sense. I'm a regular guy with a passion for music, art, and woodworking, and I use a lot of hand tools and a couple power tools to bring my passion to life.

I give a lot of attention to detail, while incorporating within my builds the items that make them realistic and playable, while ensuring unique and individual character in each.

Frets are hand-seated stainless; nuts and bridges are hand formed from a variety of materials; high quality tuning machines, pickups and strings are purchased from a supplier; cigar boxes come from a variety of sources; and neck and fretboard stock is via a friend who owns a cabinet shop.

In addition to the wood shed side of my hobby, I enhance some of my creations with the other passion I've been nurturing for more than fifty years -- I hand pinstripe and flame creations to satisfy a customer's fantasy for individualism, and I even get carried away with graphic applications when the need arises.

My goal is to design and create unique and interesting instruments that sound great, look as good as they sound, and play easily, whether it be finger style or with a slide.

TotalRojo guitars are being played and enjoyed by individuals all over the U.S., and many areas of the world, from the beaches of California to the sand of Afghanistan, and as far away as Ireland and Japan.

I also create custom-ordered cigar box guitars and battery-powered mini amplifiers, which can be personalized to satisfy the owner's wishes.

They make really cool and unusual gifts to play or to hang on the wall.

"I'm sure I have the perfect guitar for you"


Don't be shy!  Think how long it took you to get this far, so don't stop now.   

Give me a call at 406-370-4090
Or, jot me a note at jallred489@gmail.com

Thanks for stopping by!

Friday, June 22, 2012

'Bigfoot' -- The Build

For several months, my sons have been saying, "Dad, you should make a guitar of your own design, you can do it!"

After kicking the thought around in my head, I decided to try it, thus 'Bigfoot' came to be.

I've been building three-, four-, and six-string guitars (sixty five in two years, so I guess it's time to venture into the unknown) out of cigar boxes and silver bowls, so why not something more conventional?  If a guitar in the shape of a foot is conventional.

Where to start?  An idea of course.  I didn't want to go the route of the Strat or Tele design, which, by the way, I really like.  And, the dreadnaught or concert style acoustic seemed a bit boring, and also beyond what I am comfortable attacking (but, I love my Martin and Ibanez guitars), and the tools are not in my shop.

So, I settled on a plank (a solid body).

After returning from a brisk morning walk, I removed my shoes, and staring back at me were my gnarly feet, and that's when the light went on and the body of my guitar was envisioned.  Ya, ya, I know, I got an unusual imagination.  I searched the web for possible ideas, and saw a photo that I liked of a similar build, so I gave it a go.

I like the Strat style neck, so off to the web to search for the perfect item, and I managed to find it, but it hurt my wallet a bit.  And, then there is the other necessary stuff, magnetic pickups, bridge, output jack, tone and volume controls, and string ferrules to hide those nasty looking metal anchors attached to the ends of the strings.  Oh, well, it's just the kids inheritance, right?

The body blank was a 1-3/4" thick piece of bass wood cut to 14" x 22" dimensions, which was supplied by my friend Art at Carrousel Works, the greatest carrousel producing company on the planet.  Why bass wood?  Because it is easy to carve, doesn't splinter, and has a nice even grain to it.  The perfect basis for an novice carver.

So, now came the drawing of a 'big' foot to fit the plank.  I didn't want just a foot, I wanted something that is a little different, which wasn't tough to pencil out -- it took me only about five minutes for the basic design, and another ten to pencil in the toenails and top relief design.

Now, to the technical stuff for the drawing.  Determine the desired neck position and shape.  Mark the center line on the body, so the bridge can be properly placed.  Then the pickup locations fall into place, because I used only the neck and bridge positions.  Once that was done, the pots and jack was easy.

Thanks to a well equipped shop, I was able to easily cut the necessary openings and recesses with Forstner bits in my drill press, and finish off the openings with a chisel.

Of course, the cavities had to be covered, so it was time to draw a scratch plate design, which was simple -- I had the other drawing to use as a reference.  The design was transferred to a 1/8" sheet of maple and cut on the trusty band saw, along with the body.  Voila, I got the preliminary makin's for a guitar body.

It's time to start carving.  I found the little Millers Falls carving tools I purchased at a swap meet years ago, sharpened them, and went to work. Little did I know that long ago that I would use them first for a guitar, truthfully, I don't even know why I bought them.  Tools acquisition is a guy thing, just like collecting guitars -- ask my friend Ty who owns GuitarFuel, who coined the phrase G.A.S. (Guitar Acquisition Syndrome).

Carving the front and the back of the body took me about 15 hours.  I think if I do another, it will be a smoother go, because I learned a few things and I feel a lot more comfortable with the whole process.  And, there will be another, probably not a foot (unless someone has enough long lean green), but certainly something interesting.

The carving and sanding is finally done, and the fitting of pieces is complete, so it's now time for the finishing. I chose golden oak stain for the body, leaving the toenails to be a bit lighter in tone (mineral spirits with oak stain added to reach just the right color).  Mahogany stain provided the desired contrast for the flame-like relief on the top.  And, the maple scratch plate got a diluted mixture of the oak stain.  The logo and hand painted name were added to the headstock, to complete things. Once I was satisfied with this, it was on to six coats of poly sanded with 1000 grit paper between each coat.

Parts were assembled and polish applied, and it's now time to fire it up on the amp.

Wow, it sounded great and played as smooth as butter.  I got lucky, I guess.  But, maybe my boys were right.

If you're interested in seeing shots of the finished guitar, click on the link below.

http://totalrojoguitars.blogspot.com/2012/06/bigfoot-has-been-found.html


Thursday, June 21, 2012

Check This Out!

My friend Jasper shared a couple shots of a Telecaster he reworked to give it a aging relic look.  I don't know how it plays, but it sure looks cool.  I want one!

tele.jpgtele-2.jpgtele-3.jpg

He also included pics of an old bike he pinstriped, which I happen to want to steal from him.   q;-)

pin stripe.jpgpin stripe-3.jpg

Thursday, June 14, 2012

I Gotta Learn Me Sumpin!

I've been having a great time for the past couple years creating very playable guitars from cigar boxes and other found objects -- wood planks, cookie tins, and silver bowls, just to mention a few.

It's not difficult to find something that can be used for the body of an instrument, but the tough part is in determining how it can be put to creative use.  Once the idea comes from noodling it around in my mind for a while, things just seem to fall into place.  But, this whole process can take from a few minutes to a few days, especially for me, because I don't ever want to mass produce something that can be thrown together in  a short time.  Where's the fun, adventure, and skill in that?

Recently, I've been reading where a couple builders have been turning out buku numbers of guitars, at near supersonic speed, to sell at swap meets and country fairs.  One fella claims he built a six-string in three hours.  Another guy claims to have turned out more than thirty guitars over a weekend. And, these guys claim to be selling these 'Macgits' as fast as they can flip them off the bench, and for big bucks, too.

When I read these stories, I scratch my noggin and ask myself, "What in hell am I doing wrong?"  Sure, I've sold some of my creations for a tidy sum, but none of them have been slapped together like I was boiling minute rice.  And, none look the same or have the 'rustic' appeal of being unfinished.

Hold on now pardner, before you get your knickers all twisted in a bunch.  I'm not knocking 'rustic', 'cause I think that is cool.  I just don't get the time frame, that's all.  And, I sure don't understand how these guys get big bucks for a 'rustic' bucket.

Depending on the design and the materials used to build one of my guitars, it can take me from two or three days to as long as a couple of weeks to finish a guitar. Granted, I don't work 24/7, but I doubt others do either.

So, the difference must be in the recipe.

My necks all have scarf joints and are are hand shaped for playing comfort. Headstocks are usually a specific design, which requires gluing and shaping. Fingerboards are glued to each neck, and the neck is glued to a box with custom design elements to include sound holes, bridges, pickups, switches and jacks where required. Frets are seated by hand into the fingerboard. Nuts and saddles are hand formed from various materials. And, all of my guitars receive at least three coats of hand-sanded finish, before they are polished.  And, finally hardware is installed and the instrument is tuned and test driven.

Hell, it takes longer than three hours for the glue to dry for me.  So, I guess I gotta learn me sumpin!

Sunday, June 3, 2012

The 'Chippie'

A couple months ago, I found a Chippendale silver plated bowl on eBay, which I thought could be the body of a really cool guitar.

The 'Chippie' has been used, but not abused.  She is a little worn, but her body is as solid as a rock with curves in all the right places.  A bit tarnished, I suppose, but that's OK with me, 'cause she looks great.  She is smooth as silk, and comes alive at the slightest touch and encouragement.  She is not a bit bashful when you stroke her neck, and she purrs like a kitten or growls like a pit bull depending on how you treat her and if she's plugged in or not.

Well, now that I've introduced you to my new plaything, let's get on with what makes her so special.

She's a four-string electro/acoustic 25.5-inch-scale guitar tuned like the d-g-b-e strings on a standard guitar.   The action is very low, less than an eighth of an inch at the twelfth fret, which makes for simple playing.


The cherry headstock with walnut veneer is designed to emulate the design of the bowl, and the tailstock follows that design as well.  The nut and saddle are custom made from Corian, and the saddle sits on a bridge made from Spanish cedar to conform in style to the bowl design.

The neck is a hand contoured cherry extension of the headstock with a three part custom formed fretboard created from a walnut top section transitioning into a shorter cherry mid-section, and then on to an even shorter maple finale.  Hand formed frets are seated into the fretboard with small brass markers on the edge to indicate key fret positions.

The top is a thin sheet of maple laminated to a contoured ring that matches the bowl design .  A stylized sound hole is cut into the top to allow sound to acoustically escape the enclosure, and the resonance and sustain is very good for such a small enclosure.  A walnut veneer pick guard compliments the offsetting sound hole, and extends the fingerboard design onto the top.

Pop rivet grommets are inset into the top of the tailstock to guide the strings and to protect the tailstock from damage.  On the under side, the string ends are recessed for a clean appearance.  Maple strap buttons on either end of the neck underside finish off the exterior design.

Inside the bowl, I chose to install a pair of transducer pickups, which are attached to an output jack located just under the tailstock in a position that makes for comfortable insertion of an amp cord.

Speaking of an amp, this little lady sounds awesome when it's plugged in.

In addition to the custom sound hole in the top, I decided to drill smaller sound holes into the contoured outer rind, which further allows sound to escape the confines of the bowl.

Note how the ring design matches the contour of the bowl.  I thought this was necessary to give a little more life to my little lady.

This guitar is one of the more extended designs, but I am getting bored with simple cigar box creations, so I think I will continue to think outside the box.

The patina is so cool on this bowl that I had to leave it in it's original condition.  I polished it with a little guitar polish, but not enough to effect the tarnished appearance.

Not away from the use of cigar boxes, but on to more complex creations . . . at least that's what I'm thinking today . . . hell, my interest may change by tonight.   That's what makes this hobby so damn much fun . . . there are no rules.  I'm only restricted by my own imagination.

But, one thing is for certain now, I'm out of silver bowls, so I gotta move on to something else, and since I have more than 200 different cigar boxes in my shop, I'll probably create a couple more CBGs.

I hope you like what I've done with the tarnished ol' gal.


Created by my Aussie friend Jef Long

This is the latest from the stable of my Australian friend Jef Long.  I met Jef a couple years ago, while surfing the cigarboxguitarsaustralia web site.  He is one of the most creative guys I know, and he creates guitars from mostly found objects . . . wood pallets; discarded lumber; downed trees; and gawd only knows what else.  You'll note the unusual layout of the fretboard, but please, don't expect me to explain it.  According to Jef it is designed around some myxolodian concept (I think), who in hell knows, perhaps when Jef reads this he'll share the details with us.  One thing I do know is that Jef, and many other Australian builders, are some of the most creative instrument builders on the planet.   I hope you enjoy this little gem as much as I do.