Sunday, January 15, 2012

Wiring -- 'How To' for Cigar Box Guitars

Wiring pickups, jacks, switches and potentiometers into your cigar box guitar is pretty simple, if you follow the pictorial guides provided by many of the parts manufacturers and builders.

I've incorporated some wiring options into this blog post for your benefit, and for me as well, so we don't need to catapult around Google looking for the perfect schematic for a particular job.

The grounding of the guitar is the most important thing to do correctly, after you've created good solder joints.  Done right, you can have a well grounded guitar with no shielding, or you can do it wrong and have the worst sounding shielded guitar on the planet.

It is very important to ground your project so that you eliminate 'hum' (although single-coil pups tend to produce a slight hum), while humbuckers tend to be quiet. 

The general rule of thumb is ground all metal parts, and that all ground wires lead to the back of the volume pot, and then one wire is run from the volume pot to the ground lug on the jack, which will eliminate the chance of producing a 'ground loop'.  This means that each component can follow only one path to ground.  If there is more than one path to ground, a ground loop exists.

If you are using shielding tape or foil, and you have more than one component, do not run ground wires between the components (pots for instance).  Doing so will create a ground loop, because the foil acts as a ground in itself.

Most guitar schematics indicate multiple ground symbols throughout the drawing, for individual components.  It is assumed that it is understood that each ground goes to a central location (the volume pot).

If you want more information on grounding and shielding, please access the following link:  http://www.guitarnuts.com/wiring/shielding/shield3.php.


One HB & One Volume


One HB & One volume & One Tone


One SC & One Volume


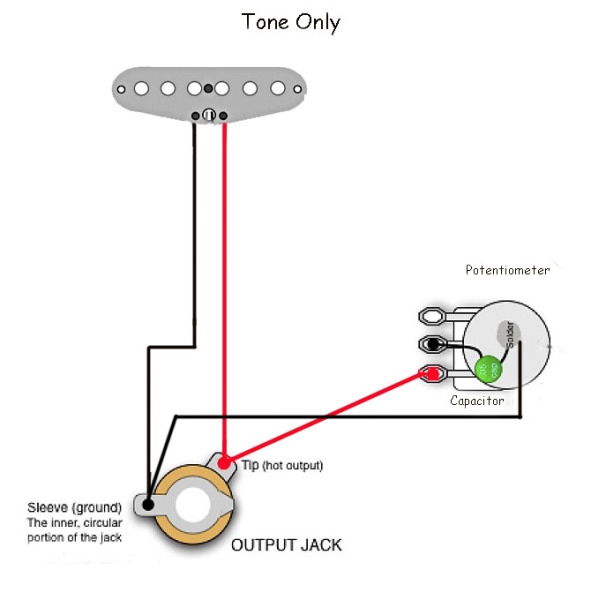
One SC & One Volume & One Tone


Two HB & One Switch & One Volume


Two HB & One Volume & Two Tone & 3-Way Switch


 Two SC & One Volume & One tone


 One SC & One Volume & Ground to Bridge
(This example shows how proper grounding can eliminate a 'ground loop)


Two Piezo & Two volume & 3-Way Switch & Jack

Standard Tele Wiring


 5-Way Switch


Tele Switch Plate


The Ohio Express

I dropped my wife off for a hair appointment a couple days ago, and decided to kill time at a local thrift shop, while waiting for her.

As I opened the door to enter, I nearly knocked a fellow down who was leaving.  "Excuse me."  "No problem."  "Anything in particular you're looking for?"  "No, just looking around, while my wife gets her hair done around the corned."  "Well, make yourself at home, and if you need help, guy is back there."  "OK, thanks."  Nice fella.  So, off I go on my scavenging journey.

It's a funky warehouse filled with the usual 'bargains', plus several guitars of varying condition, and a mezzanine loaded with musical equipment.  My first thought was, "What's that all about?"

I was looking around at all the treasures and bumped into the guy, who was working around the place straightening up tables and helping another fellow hammer studs together in the form of a table frame or something equally as exciting.  To break the conversational silence between us, I asked the guy what the deal was with the gear upstairs?

"We're the Ohio Express, and that's our gear.  "Ya, right," I said.  "Really," he said.  That broke the ice and he proceeded to tell me that the band rehearsed there two days a week, and that they had just been signed to a recording contract.  "That's great," I said.  "Oh, by the way, my name's Guy," he said.  Guy was the guy!

The Ohio Express is a Mansfield group formed in the mid-60s, who had a few hit singles ('Chewy, Chewy' and 'Yummy, Yummy, Yummy'), and several gold albums back in the day -- 1968-1973.  And, today, they are still making the circuit belting out bubble gum songs from the day, and having a good time.


(Then)


The fellow I nearly knocked down leaving the store is Jeff Burgess (second from left), and the 'guy' is Guy Hoffman (in front of Burgess, third from left).  The other fella I saw building the frames is Warren Sawyer (in the tie dyed T-shirt).

They're older now, wiser too, I'm sure.  What a hoot to bump into them.

Friday, January 13, 2012

Holiday Art Fair Ended

The Holiday Art Fair ended a couple weeks ago at the Mansfield Art Center (MAC), but it appears it is not over for me.  The 'fair' was my first attempt at displaying work, but it will not be my last.  I've been invited to hang several guitars and amps for sale in the gift shop.  If the past is any indication of the future, it will be a successful venture.

I've never considered myself an artist, and it was quite a challenge to convince myself to place my creations in the Fair.  But, with the guidance, and constant encouragement, by my family and new friends Jerry and Wanda (Art Center staff), I hung a display.

I quickly sold my favorite and most expensive guitar (the 'Stratocrapper'), followed by several others, and cigar box amplifiers as well.  All told, eight guitars and six amps found new homes locally and as far away as Oregon and California.

Someone recently said that art is subjective, and that it cannot be judged good or bad, but only art, and that the creator is an artist.  I'm not sure I'm ready to consider myself an artist, but perhaps with a little more encouragement and financial return, I'll get there.  However, some folks consider my guitars to be 'art with strings'.

But, one thing I do know for sure is, 'that a turtle never takes a step until it sticks it's neck out' . . . I stuck my neck out and the journey was a lot of fun . . . so, I wonder if that makes me a turtle . . . perhaps, 'cause I'm a little slow, but with lots of endurance and determination.

At any rate, thanks MAC for inviting me back.

Sunday, January 8, 2012

Soldering -- 'How To' for Cigar Box Guitars

I'm not an expert on the subject of successful soldering on a cigar box guitar, but I've found that if I follow a few basic principles, things go well.

Equipment --

Use the right soldering iron, a 15w to 30w wand-style iron will produce desired results, without overheating and damaging parts.  A spade tip is best for starting out as a novice, while the more experienced person may prefer a pointed tip.  And, if you're an expert, you may find an adjustable iron preferable.  They're a little pricey, but a good one can be used as a wood burning tool as well.


A 'third hand' (a little deck mounted device with two adjustable arm extensions with alligator clips) is essential for for holding small parts and wires, while allowing you hands-free maneuvering.

Needle nose pliers, wire cutters, and wire stripper should complete the basic tool needs, but there are other items you'll find useful as you move along.

Materials --

Thin, electronics-grade lead resin core solder is perfect, but blended resin core solder works just fine, too,  and it can be obtained at your local electronics store.

Stranded 22ga. to 24 ga. wire in a variety of insulation colors should satisfy your needs when working with potentiometers (pots), pickups (pups), jacks and switches.

Heat shrink tubing (1/8" for most applications) is useful for covering soldered wire joints and lugs.  It's easier to apply, and less unsightly than scabbed on electrical tape.

Shielding foil or tape works for coating the inside of boxes and cavities, which is essential for reducing/eliminating amp feedback.  There are a variety of recommendations and preferences, but I found that inexpensive aluminum foil my wife uses to wrap the Christmas turkey works just fine, and it doesn't cost an arm and a leg.  She gets a little annoyed, when I don't tell her I 'borrowed' it.

Thin copper sheeting, available from a local hobby store, is good for those times when grounding under bridges, etc., is necessary.

Electrical tape, nylon wire ties and stick-on plastic wire anchors can be useful in special situations.  And they make your creations look professional.

Good Things to Know --

*  Tinning the Iron -- Melt a small amount of solder onto the iron tip.  This will help to transfer heat from the tip of the iron to the joint being soldered.  Do this initially, and occasionally throughout your project.  Quick heat transfer means less time an object is being heated, which is good when soldering pots.

*  Tinning Wire -- Melt a small amount of solder onto stripped and twisted wire ends (1/4" to 3/8" of exposed wire).  This helps heat transfer during the soldering process, and makes the wire easier to insert into the holes on pots, jacks, etc.

*  Tip Cleaning -- Clean the tip of your iron after the initial tinning, and before soldering each joint.  A cheap and effective tip cleaner can be made from a copper pan scrubber (available from your local hardware or grocery store).  Hot glue the scrubber onto the inside of a jar lid.  Jam the iron tip into the scrubber, wiggle it around, and you got a clean tip to work with.

*  Fumes -- Although, the solder fumes you may breathe are from the flux, and not the lead solder, it is a good idea to do your work in a well ventilated area, and to avoid breathing the fumes, by wearing a respirator mask.  Always thoroughly wash your hands with soap and water after handling lead solder.

* Joint Strength -- Solder joints need to be physically strong and electrically conductive.  Good surface preparation is essential for a desired final result.

Soldering to Pot and Jack Lugs

*  Always make sure exposed wire leads are short and tidy (1/4" to 3/8").

*  Twist wire strands together with no stray wires sticking out.

*  Apply heat to the exposed wire for just a couple seconds, and then touch solder to the wire (tinning).  Solder should melt and flow into the wire, just enough to coat the wire -- no large globs needed.

*  Bend the 'tinned' wire into a 90-degree angle at the mid-point of the exposed lead.

*  Insert the bent wire end into the pot or jack lug, and crimp the wire closed over the lug.

*  Apply the iron to the lug for a couple seconds, and touch the solder to the junction.  The solder will quickly melt and smoothly flow into the joint of the wire and the lug.  You should end up with a clean, smooth, and shiny joint.  Let the joint cool slowly -- DO NOT blow on the soldered surface, as this could cause the joint to fail.

*  Heat shrink tubing can be slid over the wire to cover the lug joint.  It is not necessary, but it will look professional.

Soldering to Pot Casing Surface

There are times when 'ground' wires must be soldered to the back casing of a pot.  This can sometimes be a little problematic, but necessary and effective if done properly.

*  Lightly sand the back casing of the pot to ensure a clean surface on which to solder.

*  Heat the casing with the iron, and apply a small amount of solder to the spot being heated. DO NOT OVERHEAT.

*  Strip insulation from the wire in the same manner as when preparing a wire for soldering to a lug (1/4" will work).

*  Twist and tin the wire.

*  Lay the tinned wire against the area on the pot where you applied the spot of solder.

*  Touch the iron tip to the wire and the casing (heat the parts equally).

*  Solder at the junction of the wire and casing will melt together to form a strong bond.  This should not take longer than a few seconds.  DO NOT OVERHEAT the casing, and this may damage the pot.

*  A successful joint should be flat, smooth and shiny.  A 'blob' of solder is an indication of a 'cold' joint, which is not acceptable for optimal conductivity.

Soldering Wires Together

*  Strip the wire ends of the wires to be joined together (3/8" should do it).

*  Slightly 'flare' the wire ends, and mesh the wires together, end to end.

*  Once the wires are meshed, apply pressure with your fingers and twist the wires together, until they are firmly joined.

*  Heat the wires with the iron, while melting a thin but adequate amount of solder to flow nicely into the bare wires, which will complete a solid joint.

*  Let the wires cool, and add a strip of heat shrink tubing to cover the exposed wire.

Saturday, January 7, 2012

'The Raven'

I don't often build cigar box guitars to be electric only, but 'The Raven', which is created from a black Studio Tobac cigar box, is an exception.

The box is not very thick, only about an inch and a quarter, which doesn't leave much room inside for the sound to bounce around.  So, with that in mind, I decided to install a single-coil magnetic pickup near the bridge, and to forego any acoustics.

The box is really 'clean' and nicely formed with rounded edges and lightly embossed lettering on the top, so it made for a real cool looking creation.  The scarfed cherry neck is a simple straight-on design with a walnut veneer on the headstock.  Old style open gear tuners adorn the headstock, and a hand shaped Corian nut leads the hand-fretted maple fingerboard, which is followed by the covered pickup with hand crafted walnut veneer surround (it looks yellow inthephot, but it's really walnut).  A volume control is wired on-deck to allow for easy sound adjustment.  The saddle and bridge is a combo of an old key I had laying around mounted to the surface of a small piece of Spanish cedar.  The string arrangement is a through-body design with a custom made Spanish cedar retainer.  Like all of my three-string guitars, I used the 5-4-3 (A-D-G) strings from a regular acoustic set, for this build, too.  The Strat style jack plate works with the thin box, and wood strap buttons finish off the guitar.   It is tuned to open G (G-D-g) and sounds great through my Belicoso CBAmp, and awesome through the Crate.


Saturday, December 31, 2011

'The Grape'

I got a really cool cigar box, from my friend Ed, and I turned it into a nice-playing three-string,  electro/acoustic guitar.

There is nothing exceptional about the design, but I did make the tailpiece to look like the headstock.  The scarf neck is cherry with a piece of zebra wood laminated to it, and the fingerboard is maple with handset frets and a little grape cluster adornment at the end.  The nut and saddle are Corian -- geez, that stuff is nice to work with, and the final result is great. 

There are times when simple is better, and I think this is one of those times.


Bridge Positioning Tool

Locating the bridge on a guitar isn't brain surgery, and there are several ways to do it. 

One way is to use a fret locater chart and a metric ruler to mark the fret positions, and then to measure the distance from the nut to the twelfth fret.  Use this distance to measure from the twelfth fret to the position where the bridge is to be located.

Another is to copy the measurements from another guitar, and mark them on your new build.

Or, you can make a special gauge from some material (wood, plastic, metal, etc.) which has little notches cut out on the edge to indicate where the frets and bridge should be.  This is what I've been using, and it has worked great.  But, I wanted something different and a little more sexy than a stick with notches.

If you don't mind spending $38 plus shipping, you can purchase a really cool little tool from StewMac, which will do the bridge location job very simply.  But, when I looked at what I would be getting for 38 bucks, I decided I could make the same thing for about a buck-thirty-eight. 

A couple pieces of discarded oak and maple, a brass rod left over from when I was using it for nuts and saddles on my earlier creations (cut long enough for it to be used on short-scale builds or on long-scale bass), and a nut and screw from the many bins in my shop, a drop or three of super glue, and voila . . . I got a real honest-to-gawd adjustable bridge positioning tool, which even looks better than the 38-buck deal, and it works perfectly.


Here it is, a simple, adjustable bridge locater.

A quarter-inch maple piece is shaped (it can be square or rectangular --
I just like things a bit more sexy) and drilled to accommodate the brass
 rod, which is glued in place.  The rod is flush with the outside of the
 piece, which is the surface that will rest against the nut.

The half-inch oak piece, shaped just like the maple, is drilled slightly
larger than the rod, so that it will slide easily on the rod.  A hole is drilled
through the top to join the other hole, and a nut is countersunk and
glued in place to accept the turn screw, which will lock the slider in
place.

A shallow slot is cut into the base of the oak slider, so it will rest on
the twelfth fret. 

The finished tool is ready to use. 

Place the tool on the fretboard (after the frets are in place) with
the tool resting snugly against the nut.  Move the slider to a position
where the notch rests on the twelfth fret, and lock it in place with the
turn screw.

Lift the tool off the fretboard, turn in around 180 degrees, rest it once
again on the twelfth fret, and mark the bridge position, which is defined
by the end of the tool.

It's that simple, and effective . . . and only a buck-thirty-eight!

Wednesday, December 21, 2011


To all my friends, and to the people who view my site,
I wish you a very Merry Christmas,
and the most prosperous and
Happy New Year 2012.

Monday, December 19, 2011

Bruce Likes the Indian


This is my buddy Bruce salivating over his new guitar. Already he's changed the name to 'Big Chief Buffalo Nickel' to match the theme of the amp.  I like the hat, but I'm not quite sure what the 'Ho' represents.  Merry Christmas B!

Wednesday, December 14, 2011

'Smoke Roots'


I built this three-string electro/acoustic guitar for my friend Ed who owns Woodland Cigars in Delaware.

The body is from a cigar box made exclusively for his shop, by Carlos Torano.  It is a really cool box with  what appears to be Spanish cedar sides and a cedar and perhaps birch laminated top, which contrasts well with the black walnut neck and maple fretboard. 

A mahogany veneer finishes off the scarfed seven degree headstock, while a fabricated tailstock string retainer makes it easy to change strings when the time comes.  Corian nut and saddle maintain a low string action for finger style pay.  Frets are all hand set, as usual for my guitars, and the poly finish really makes this sleek little devil look good. 

Resonance and sustain is very good, which undoubtedly comes from the interesting box construction.

Tuesday, December 13, 2011

Scarf Jig

I decided a while ago to vary the manner with which I create head stocks for my guitars. 

So, I commenced to search for information about how to make a scarf joint, which is the design of most commercial acoustic guitar necks.  A scarf joint is the design which makes the headstock set at an angle to the neck.

There are any number of sites that make recommendations, and most of them suggest cutting the angle with a handsaw and doing the finish planing and fitting with hand tools. 

After studying the recommended process, I decided that creating a scarf joint didn't need to be such a cumbersome and labor intensive process, to say nothing about the production inconsistencies which can result. 

I built a simple jig to fit on the table of my power saw, and voila, there came a perfectly sawed and angled headstock.  And, I can easily vary the angle from 7-12 degrees, and the angle of the cut remains constant from neck to neck.

In the first photo, you will see the simplicity of the jig. 

The base is a piece of 1"x10" pine with a length of screen door moulding fitted to the bottom as a guide for the base to move accurately along the guide slot in the table of the saw.  A dowel handle is glued into the base for safe movement of the jig through the blade. 

The angle guide (protractor) pivots on another dowel at its leading end, and a small eye screw was tailored to act as a angle lock pin at the trailing end of the base.  All that is needed is to decide what degree of angle to cut the scarf joint; set the pin in the proper hole; insert the blank neck stock into the guide (second photo -- notice the small retainer piece near the leading edge of the angle guide, which holds the stock in place throughout the cutting); clamp the neck firmly in place and cut the angle. 

The position of the neck stock in the jig will determine where the cut is made, which in turn determines the final length of the headstock.

Once the cut is made, the neck and small severed piece is removed.  The small severed piece of stock is flipped 180 degrees and glued to the opposite side of the neck, forming the angled headstock desired.


It's that simple, quick, accurate and not very labor intensive, which all works for me.

When the glue sets (usually 12-24 hours depending on what glue is used)  other pieces can be added to complete the design; shaping of the headstock takes place; some type of veneer is added to the top to hide the scarf joint; and the neck is then finished and ready for installation.

Saturday, December 10, 2011

Some Places I've Been, and A Few I Haven't

I have been in many places, but I've never been in Cahoots.  Apparently, you cannot go alone.  You have to be in Cahoots with someone.

I've never been in Cognito.  I hear no one recognizes you there.

I have, however, been in Sane.  They don't have an airport, you have to be driven there.  I have made several trips there, thanks to my friends, family and work.

I would like to go to Conclusions, but you have to jump, and I'm not to much on physical activity anymore.

I have also been in Doubt.  That is a sad place to go.  I try not to visit there too often.

I've been in Flexible, but only when it was very important to stand firm.

Sometimes I'm in Capable, and I go there more often as I'm getting older.

One of my favorite places to be is in Suspense!  It really gets the adrenalin flowing and pumps up the old heart!  At my age, I need all the stimuli I can get.

I may have been in Continent, and I don't remember what country I was in.  It's an age thing.

'The Forest'

Check out this song by Bemuzic, it's awesome.

http://www.youtube.com/watch?v=cabDBf9xkSA&feature=channel_video_title

She is playing a 3-string cigar box guitar, through an SD-MAH3 GuitarFuel amp.  Pretty impressive.

Monday, December 5, 2011

'Big Chief Buffalo Nickel'

I mentioned in a previous post that the 'Indian' guitar sold to a Montana fella who wanted me to build a matching amp to go along with the git.  He's already renamed the guitar.  It's now 'Big Chief Buffalo Nickel', because his favorite bluesman is Leon Redbone, and one of Leon's song titles is the name Bruce picked.

Well, I've learned that the Indian Tabac cigars are not the most popular, so boxes are not as readily available as other smokes, which made it difficult to create a 'matching' amp.  Besides, I didn't really get all that excited about using a similar box for the blower . . . it would be too boring.

So, I got to looking through the hundred or so cigar boxes that I've collected to keep my hobby going, and I spotted the perfect shell, a Saint Louis Rey cigar box that is just the right size for an amp.  And, in this case, the basic box design lends itself perfectly to the build.

Ideas started to rattle around in my mind and I called my son Jay to see if he could put his Photoshop genius to work on some art for the box.  Of course, he said yes, and I was off and running to my shop.  I wanted this amp to have a little 'old west' flavor to go along with the guitar, but I won't bore you with design details, because you can see that in the photos loaded here.

The guts of the amp are the same as all my other amp creations . . . GuitarFuel SD-MAH3 harness . . , because the GF harness is simply the best there is to choose from.  It's a little pricier (a little) than some of the other junk you can find on the web and eBay, but 'you get what you pay for', a super product, and my friend Ty Falato is a great guy to work with.

If you like what you see, let me know.   But, if you don't like it, go roll a smoke and and in a couple minutes your attitude will change and you'll be wanting me to build something for you.

Here's the git and the 'matching' amp:


This just might be the coolest amp I've built, and it goes to a great friend.