Well, here's what I further understood. Some tools and jigs are very simple in construction, but costly, so I decided to create my own, with the exception of a couple, which are more complex or made from materials I do not have at my exposure. I'm fortunate to have a shop full of the basic woodworking and craft tools, and enough experience gained through past experiments to tackle the 'special' tool making endeavor, plus I simply get a rise out of creating my own stuff.
- 0 -
A body mold is essential. It can be as simple as laminated cardboard pieces cut in the shape of the guitar body, or as complex as an item costing a hundred dollars or more. Or, something in between for a lot less money. I chose the middle ground, and spent about $12 on materials to build a mold that is hinged at the bottom and will close with a spring latch at the top, which will keep all the guitar surfaces in place during the building process.
- 0 -
These spreaders are for the center inward angle of the body,
and for the bottom bout. The spreader for the upper bout
(which I still need to build) is similar to the bottom, only shorter.
(which I still need to build) is similar to the bottom, only shorter.
This spreader is used when gluing the neck and end blocks
in place at the top and bottom of the guitar.
- 0 -
- 0 -
Cam clamps of various description are needed in special circumstances and they too can be purchased, if you don't mind coughing up $19-35 plus shipping each for simple devices like the ones I created for less than $2.50 each in materials.
The upper clamp arm slides on the metal shaft, and the cam lever tensioner can be
adjusted to hold things securely in place during the gluing process.
- 0 -
- 0 -
A special clamping caul is essential when gluing a bridge to the top surface of the guitar, due to the uneven surface of the bridge. So, for about $1.20 and a piece of scrap wood stock and a small piece of sheet cork, I built a custom piece that would cost $60+ from a supplier.
The clamp is centered on the bridge and held in place through the sound hole
by one of the adjustable clamps pictured above. Then the screws on either end
by one of the adjustable clamps pictured above. Then the screws on either end
are adjusted to hold the ends of the bridge firmly to the body during the gluing process.
- 0 -
- 0 -
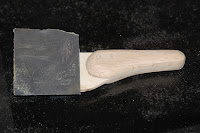
Another nifty little item is a homemade fret dresser, which is simply a sheet of eighth-inch ply with laminated and shaped pieces for a handle. The straight edge of the ply is grooved to fit the contour of a fret. A small piece of very fine sand paper is wrapped over the leading edge of the tool and rubbed carefully on the frets to dress down any sharp or uneven edges. Cost to make $0.


- 0 -
Saddles are the bone (or other material) pieces on the top of the bridge, which hold the strings off the fingerboard and guide them at the proper angle along the neck. Usually, the saddle top edge is slightly rounded over, which can be a simple task or a little more difficult. I like simple, so I created a little tool out of a dull box cutter knife blade. I cut a thin slot in a piece of scrap oak, inserted the blade sharp-side down in the slot, and voila, the rounded adjustment slots on the blade can be used to round over the saddle stock., by sliding it along the saddle. Cost to make $0. Cost to buy, I don't know, 'cause I've not seen one on the market.
- 0 -
And, this jig is for applying tension to bracing material on the inside of the top and bottom surfaces of the guitar. I suppose a combination of books, bricks, or Weider weights could be used to hold the bracing in place, but again I like a simpler approach, even if it requires a little thought, exploration, or piracy of an idea. The jig shown here has a bottom deck and top surface which is slightly larger than a guitar body. The two surfaces are separated by about 20 inches with a dowel on each corner, which is secured in place with screws. The guitar top is placed on the bottom jig surface; finished bracing is glued and applied to prearranged locations on the guitar surface; and long, thin dowels are placed on the bracing and wedged under tension against the top surface of the jig to apply uniform pressure to the bracing during the drying process, which holds everything in place to ensure a sold glue job. Cost to build about $30. Cost to buy $450+ at your favorite luthier supply store.


Clever builds! We featured your clamping caul in one of our recent newsletters, properly credited and linked of course: http://mailchi.mp/homemadetools/lathe-milling-attachment-adjust-tru-chuck-extended-basin-wrench
ReplyDeleteI hope we've been able to bring you lots of visitors. Cheers :)
Thanks for viewing the site, and for sharing with your viewers. I traveled over to see what you've been up to and was thoroughly pleased with the journey. :-)
ReplyDelete