Sunday, February 15, 2015

'Francesca' is in the oven

After seeing my last acoustic creation ('Gabriella'), my friend David suggested that I commence to add some 'Jess stuff' to my builds.  I asked, "What might that be?"  And, David replied, "Some special personal creativity that reflects your ability.  Don't be so timid about it!"

I've given a lot of thought to what David had to say and I think he's right, I'm not as expressive with the acoustic creations as I've been with the cigar box guitars I've built.  I'm not really timid about it, just not as confident.  Perhaps because the acoustic creations are 'real' guitars, while the CBGs are less traditional and a lot more funky.

Well, 'Francesca' is in the oven and she will be a whole lot more like what David may have in mind.

To get started, I had to decide how I might approach being more expressive.  I like the dreadnought body shape, so I'm not changing that, however, there are subtle things I can do with it to add a little spice . . . I'll just have to experiment.  Because of the nature of the beast, the dreadnought is what it is, and when I start messing with the shape it's no longer what I prefer.

So, where to begin?

I decided to do something special to attract attention without major body modifications.  Thus, a unique headstock overlay design.  A sound hole rosette inlay to match the overlay.  And, a tailpiece insert that matches.

The design, according to my son Jay, is 'cubist'. Perhaps it's a reflection of what Picasso might have come up with if he was into guitars at the time he was creating art.  I'm familiar with Braque and Picasso art, but that wasn't what I had in mind when I ventured off into my creative journey.  I just wanted to produce something colorful and unique in design to accent parts of my guitar.


This is the headstock overlay, which is created from 21 individual pieces of exotic wood individually cut from 1/16" stock.  I worked from a pattern I drew, but decided on the specific wood choice as I moved along in the process. Each piece is glued on its edge to the adjacent piece.  You'll notice the base of the design is a stylized guitar shape in walnut. Other woods are purple heart, chatke kok, zebra wood, spruce, yellow heart, rosewood, Spanish cedar, mahogany and blood wood.

  
The sound hole rosette follows the overlay theme with 22 individual pieces glued together in the same manner as the headstock.  The trick here was to join the pieces and to cut the shape without breaking it.
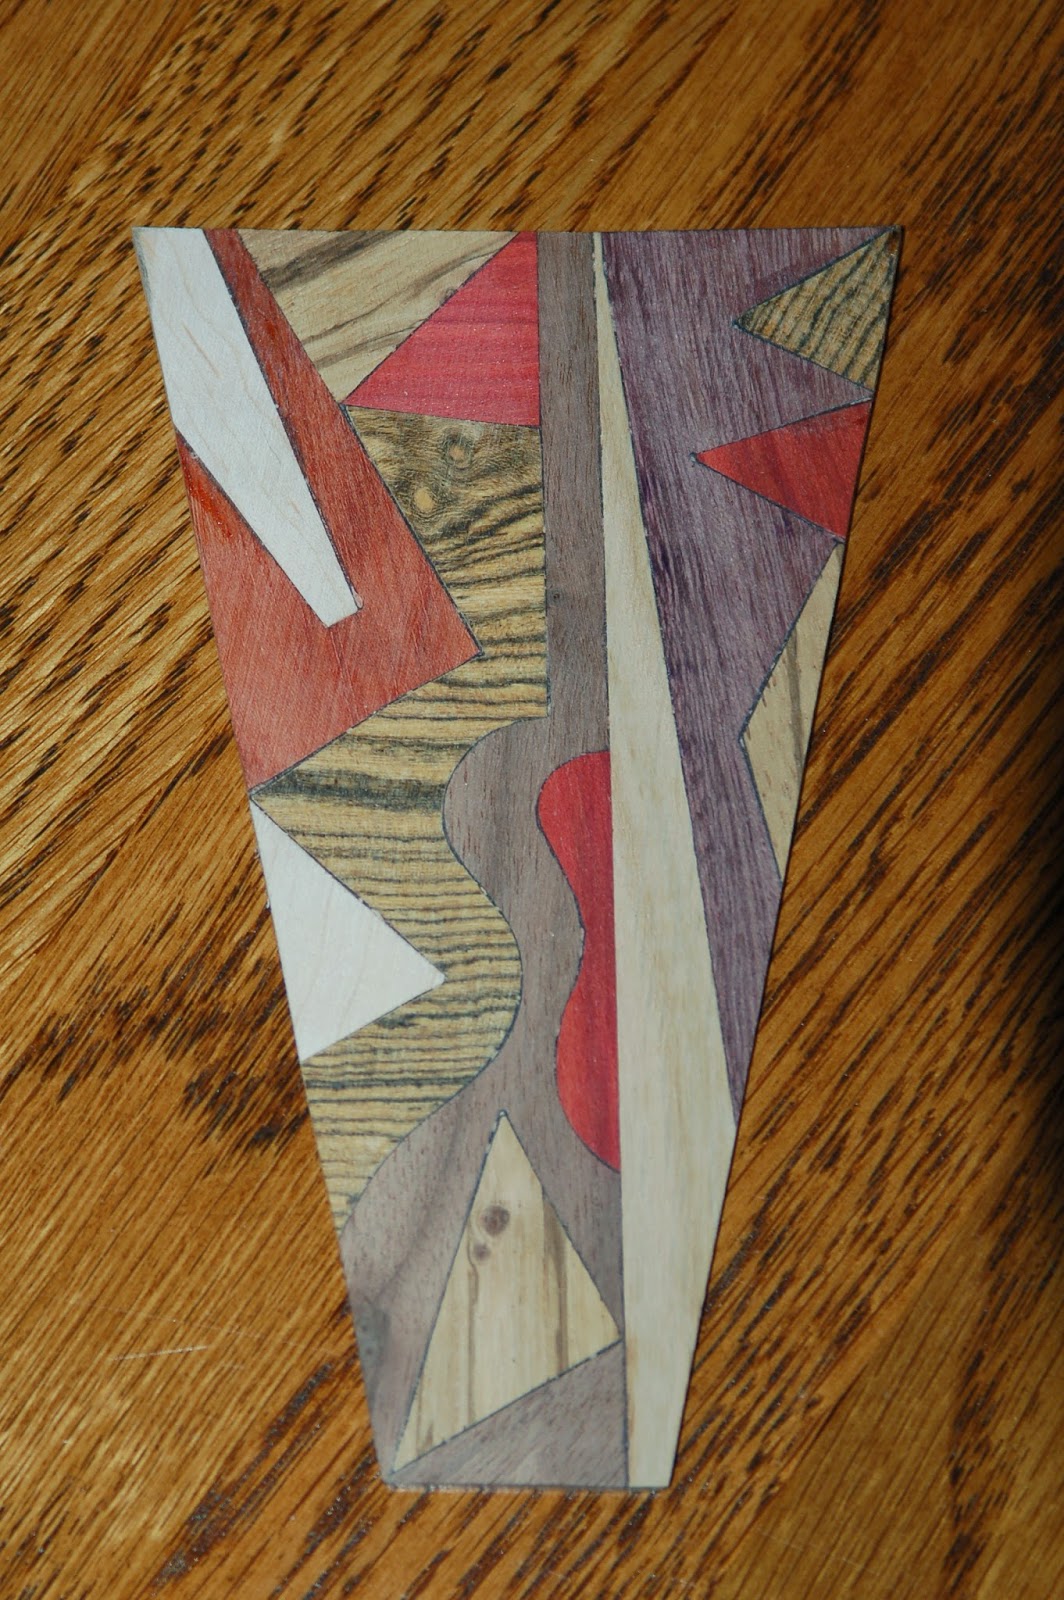

Here's the tailpiece insert comprised of 16 pieces of 3/32" wood matching the overlay and rosette. This piece is slightly thicker, because it will be 'sandwiched' into an opening where the side ribs come together at the back of the guitar.  Again, you'll notice the subtle shape of a guitar as the base for the design.


Work in process.  The overlay is glued and curing, while the insert is being completed.  The drawings are my guide.

I hope Pablo doesn't mind me unintentionally intruding on his turf.

I'll post more photos as the build progresses.

Saturday, February 7, 2015

Oh, Ya, You Really Want Me To Play?


My young friend Richard contemplating what he wants to do with his new TotalRojo guitar.

Rich's grandpa and I have been friends for more years than either of us care to admit, which would probably put us in the 'old' category, but 'old' is a state of mind right?

Joe and his wife Jeri told me how Rich likes music and sings all the time, so I got to thinking about it and decided to gift a three-string guitar to Rich to get him started playing as well as singing.

Tuesday, February 3, 2015

'Angelina' and Albuquerque

The Vintage Albuquerque auction to raise funds for Children's Arts Education in Albuquerque, New Mexico has once again asked me if I would create a special guitar to be auctioned in their special event June 24 - 28, 2015.  Of course, I said yes.  If you're interested in learning more about this wonderful event, go to www.vintagealbuquerque.org.


                    In the meantime, let me introduce you to 'Angelina'.  

The basis for the 'Angelina' build is a large Riunite wine box, which I acquired a while back with no special intention in mind. But when my friend Cate Stetson asked me to create another guitar for this year's auction, I knew just what I'd do.

The size of the body shouted 'acoustic', so the basic decision was easy. However, that was only a starting point.

The neck is a one-piece mahogany 'D' style bolt-on design complete with triangle shaped volute to give it character.  A rosewood headstock overlay, Corian nut and rosewood fingerboard with pearl position markers complete this part of the package.

As we move along in the description of the build, I'll try to point out the more interesting and necessary elements that went into creating what turned out to be a really nice sounding and very playable instrument.


                                                    Grover tuning machines tension the strings.

Traditionally, acoustic guitars are made from solid pieces of wood, but when creating something special, tradition sometimes takes a back seat.  Some would argue that only traditional methods produce playable instruments, but that is not always the case.  The body of this guitar is a box made from laminated pieces of Spanish cedar, and who knows what else makes up the three layers of sheet.

We'll get to the internal parts that make this playable in a moment, but until then let me explain the top.

The bridge is rosewood with Corian saddle. The sculpted pieces at the corners are crafted from mahogany to give life to the top. You'll note that the Vintage Albuquerque logo subtly appears in the top right-hand design. The other designs have various size circular openings, which I hope you will imagine to be bubbles in the wine . . . 'tiny bubbles in my wine, tiny bubbles make me feel fine!'

The wine box itself is well constructed with dovetail joints at the corners, but to further reinforce the construction, I added 'X'-style bracing to the inside of the top and lateral bar braces to the inside of the back.


The box top was originally hinged on one side for access, with clasps on the other side to secure the lid.  But, since the body had to be one piece, I glued the top in place and eliminated the hinges, but left the clasps in place. Of course this left the hinge side looking pretty naked, so I hand carved a couple mahogany grape clusters to accent things.  The contrast in color is a little less dramatic than in the reflected light on this photo, but the idea is visible.


On the tail end of the body, I wanted to do something that would accent, while keeping with the theme, so I cut out a grape leaf shape from a piece of Rosewood to match the fingerboard and headstock overlay.

The VA logo is included in this piece as well, to further the identity of the occasion for the creation.


I chose to create a stylized New Mexico State Flag to accent the back.

The center 'sun' cutout is a piece of Spanish cedar left over from a previous build.

And, the 'rays' are thin pieces of hickory cut into the shape of wine bottles and lightly stained, for contrast with the cedar back.

I could have gone the traditional  design route for the flag, but that's not what this guitar is all about.  I built it for a special occasion and the details needed to be a bit special, too.


The neck heel cap is a piece of Leopard wood separated from the mahogany neck by a  thin piece of Sitka spruce, which adds a little detail as well.


The finish is several hand applied coats of a mixture of Linseed Oil and Turpentine, which I chose at the suggestion of my friend David.  He thought the treatment on the raw wood could work well, like it does on fine furniture . . . he is correct.  The satin effect is an 'old glow' that is perfect for a piece of modern day folk art.

I hope the folks at Vintage Albuquerque like 'Angelina', I know I do, and it will be difficult to let her go. But, I know her new owner will enjoy her.

Friday, January 9, 2015

'Gabriella' is better than I expected.

I've repaired a bunch of acoustic guitars, but I've only built a couple from the ground up.  Along the way, I've learned a thing or three, not the least of which is that every creation is considerably different no matter how much the overall design remains constant.

The full size dreadnought shape is my go-to choice, because I like the clean lines of it, and because the body mold and rib bender in my shop fit that style.

There is a significant amount of effort and a boatload of patience that goes into building any guitar. First of course is the design choice.  Then comes the selection of wood for the project, which requires involved thought . . . type of wood for the back, sides and top; thickness sanding necessary to achieve the proper tone, and every type of wood has characteristics which effect how the guitar will play and sound; binding; rosette pattern and material; scale length; type of wood for the neck, fingerboard, bridge, and headstock overlay; machine head type and style; and the list goes on.

Once all the choices are boiled down to what will be final, the fun begins.  The top, back and side ribs must be profiled (cut to shape).  Bracing design and material is chosen for the top and back, and hand shaped and glued in position  Ribs are bent to conform to the desired shape (this in itself is not a monumental task, but if it's screwed up along the way, there's no fixing it, just start over). The ribs are placed in a body mold of the desired shape and lining is glued to the inside of the ribs on which the top and back are then glued, creating the body. The neck is shaped to fit the body, which if not done precisely the guitar will not play properly, and it's best use will be as a fly swatter. The fingerboard is slotted and frets pressed into precise (again an absolute necessity) positions, and then it is glued to the neck. A headstock overlay isn't a necessity, but it adds a nice touch to the overall design and appearance of the guitar.  The bridge is the next piece (that, if not properly installed, can make the guitar useless), designed and shaped to desired proportion and glued in position on the top. Now, we're on the home stretch, parts are assembled and the raw guitar is ready for sanding and finish, which in itself is another matter of choices . . . lacquer, poly, oil, paint, varnish, and a few more.  There's a lot left to do, but I think you get the idea, building a guitar is a little more than assembling pieces.


Meet 'Gabriella'.

She is a full-body dreadnought guitar with Sitka spruce top with rosette inlay around the sound hole, Ovangkol sides and back, hand-formed spruce bracing on the inside of the body, Mahogany one-piece neck with medium gauge frets, Rosewood fingerboard with pearl inlay position markers, Rosewood headstock overlay, Rosewood bridge, Corian hand-shaped nut and saddle, Grover closed gear machine head tuners, and 16 hand applied coats of TruOil for the finish.

'Gabby' sounds a lot brighter than she looks, but she does look and feel real good, too.

As I mentioned, every guitar has a unique sound due to the shape and type of wood used in the creation.

I thought the Ovangkol wood on the sides and back might have a warm sound, because of the density, but as it turned out, it is quite bright and resonates very well.

Sustain is good, which is an indicator that the neck/body joint was done properly (whew!).

I chose not to add a scratch guard to the face of the top, because the spruce grain is so clear and I think it looks good 'clean'.

I love the wood grain of the bookmatched Ovangkol back. There is nothing like the grain in exotic wood, and every piece seems to have its own look and feel.


The sides are Ovangkol, but from a different cut.  I had a back that matched the sides, but I chose to use the highly figured back instead, for a unique contrast.

The heel cap is a combination of a piece of spruce left over from profiling the top, and a piece of scrap Ziricote left over from another build.

If you look closely, you will see that the binding on the edges is Walnut, which I cut and shaped in the side bender. I like the suttle effect.


How it started . . . bent sides.    The body before finish is applied.


The back, before the TruOil was applied. It is so cool, how the finish pulls the grain out and darkens the appearance.


A close look discloses that the headstock, fingerboard tail, and the bridge all are consistently shaped to compliment the overall design.  I like the look a lot better than a squared off design.


Well, that's it for the introduction to 'Gabriella', I hope you like her.

Wednesday, December 24, 2014

Guitar Repair -- Before and After

Before


In a recent post, I explained how this guitar, which was found in a high school storage closet, had taken a beating.  The badly warped top had separated from the body and the fingerboard was loose on the neck. Other than these two issues, the guitar was in pretty favorable condition.

After


Here is the same guitar with a new top and an overall reconditioning.

On the outside, it looks like a new 000 Martin cutaway guitar with pre-amp, which works beautifully since the corroded contacts were cleaned and the old battery replaced with a new one.

But, on the inside it is very different.  I chose to replace the limited bracing with a full-on pre-war D18 style hand formed scalloped brace design for the top.  The internal lining and back braces were reinforced with super glue to stabilize the composite body. The ebony fingerboard was re-glued to the neck, and the warped ebony bridge was flat sanded and re-positioned on the new Martin top, which has six hand-applied coats of TruOil finish.  A new tortoise shell-style scratch guard matches the sound hole inlay, and Ernie Ball light gauge acoustic strings finish off the re-build.


Ian took it for a test run, and I think he likes his 'new' guitar.
By the way, he is a great fingerstyle picker.

Friday, December 12, 2014

Why Would Someone Trash A Martin Guitar?


My young friend Ian found this Martin guitar in a closet at his school.  He asked someone if he could have it,. and the rest is history.  We're repairing it.

Sure, it's not an expensive model, but why would anyone trash a Martin guitar, or any musical instrument for that matter?

This particular guitar is a Martin custom created especially for Guitar Center stores to sell.  It has composite sides and back.  Spruce top with inlay surrounding the sound hole.  The bolt-on neck is one-piece made from thin strips of wood stock laminated together.  The fretboard and bridge are ebony, with bone nut and saddle.  And, it has a Fishman equalizer with Piezo bridge pickup, and Martin closed-gear tuners.

Now, for the not so good stuff.  The top is so warped, from (I think) extreme temperature and humidity change, that it's not salvageable.  And, as you can see in the photos, it has come apart from the interior lining, and the bracing is shot.  The back has also lifted from its lining in several places.

Aside from the top, everything else can be salvaged, and I'm confident that Ian and I can repair it with no problem.  

My friends at the Martin factory came through for me, as usual.  They had a replacement top and scratch guard in stock, and it's on its way to me as I write this missal. I'll need to profile the top and fit it with bracing (modified of course for more stability), but that's no big deal.

When we get done with the repair, it's going to be a better-than-new rig.  Maybe Ian will let me play it.

Wednesday, October 22, 2014

Bending Acoustic Guitar Sides

Crafting an acoustic guitar is not only about design and acquisition of desired wood.  It's about tools necessary to accomplish the project in a way that is successful.

In my short tenure of building acoustics, I've learned one important thing.  You must either have a full piggy bank and a willingness to part with large quantities of cash, or the ability to create unusual tools necessary for a satisfactory outcome.

One of the tools of the trade is a side bender, which is used to form raw wood into the desired shape for a guitar body.  A heat generating tube is one method, which is used by many luthiers, and another more elaborate device is a side bending machine.  I've built both, but I think the 'machine' will work best for me.


The photo above is of the tube style side bender, which I designed and built several months ago.  As you can see, it's pretty simple , , , a heating element, controlled by a rheostat, heats the copper tube to the desired temperature, and the guitar side wood is hand-shaped around the extended tube.  There is a bit of trial and error involved with this type bender, and the final result can be irregular in shape.

The bending machine on the right is a creation I designed and completed today, which takes the 'guessing' out of bending acoustic guitar sides.

The design of my machine is similar to those used by other guitar builders, but I tried to take the best ideas from other machines and to incorporate them into a unit that would work best for me.  I'll try to explain why I designed it a certain way, and how it works.

It's a four-part creation made up of a base (the brown part), a body form, which sits inside the base, (this particular form is for a dreadnought style guitar), a specially designed retainer, which is located at the end of the screw press rod, is used to form the depression at the waist of the guitar side, and four spring-loaded retainers, which hold the raw guitar side wood securely on the form during the bending process.


Yes, those are light bulbs you see on the surface of the base, which are the heat source for the process.  The inside of the body form is lined with reflective foil, and the top is covered with a sheet of stainless steel.  The waist retainer rides smoothly up and down the slotted openings in the base, because of an embedded steel blade in the retainer.  The other movable retainers (the dowel rods are there to protect my hands from being burned on the heated surface during the alignment process) can be strategically positioned at bend points on the surface of the body form to hold the wood side in place during the heating and cooling process.

I chose light bulbs for the heat source, because a luthier with thirty years experience says it's the least expensive and equally efficient way to conduct heat to bend wood.  Another method is to use a heat blanket, but it's costly and requires more pieces to mess around with.  Due to the dreadnought shape, I chose to use a 100 watt bulb in the upper bout position of the bender; a 75w bulb at the waist; and a 150w bulb for the lower bout (this will equalize the heat in consideration to the distance of the wood from the bulb.  And, the temperature can be further controlled by a light dimmer on the face of the machine.  To further control the process, I added a simple-to-use kitchen timer to the face of the machine as well, to control the 'cook' time.

This photo shows the machine set up and ready to accept  raw side material for bending.

Raw wood material is cut to the desired shape of the side pattern (profiled), and sprayed with distilled water to adequately wet it for bending.

The moist side material is then wrapped in craft paper to retain moisture, and inserted onto the stainless steel bender surface, under another movable stainless sheet.  The waist position is marked on the raw wood so as to center it correctly with the waist retainer (the center mark can be seen through the vertical retainer slide opening).

When the desired temperature is reached, the movable spring-loaded retainers are carefully moved into position shaping the side as they are positioned.

The raw material is left to 'cook' for a specified time, and then it remains in the bender to cool down, before being removed to a body mold for a longer cure time.


Why did I build this contraption, which my wife says looks like something Frankenstein might have used in the lab?  Well, the reasons are not complex.  I could pay someone to bend sides for me ($50 a set), but that seems a little foolish.  If I can build a complete guitar, I should be able to build the tools necessary to complete the job.  And, a finished bender similar to what I just created, for about a hundred bucks, sells for $485-$590 on eBay.  It seemed like a no-brainer to me.  And, besides, I love the process.  I think I may have been a mechanical engineer in a former life.

Thursday, October 9, 2014

'Cristine'

Why do we name our guitars, and why do we seem to always choose a woman's name?

I don't know, and I've really not put much thought into it, until now.  Perhaps it's because the guitars look really good.  The shape of the body?  Could be, because the usual hour-glass shape is sleek and kinda sexy. How it sounds?  Ya, especially when she's happy, there's nothing that gets your blood moving like a shapely woman purring like a kitten.  How it feels?  Oh, ya, I don't think this needs an explanation.

'Cristine' seems to fit my latest build pretty well.

She started out rough, but with a little tender care and attention she has turned out quite lovely.


Imagine, if you will, the body being a  rough slab of wood, which was in the first stage of a build.  The pickup cavities and neck pocket had been routed on the front, and the switch and pot opening had also been cut out on the back side, but that was the extent of the work, before, as legend has it, that the owner stopped work because of the onset of Alsheimer's disease.  It laid around in my friend Pat's shop for years, until he thought I should have it.  I'm always a sucker for a vintage project.

I don't know where the old after-market 25.5-inch scale neck came from, but it was the only thing about this basket case that led me to think it could be turned into something worth having.  It has real nice Grover tuning machines, so I was sold the minute I saw it.

The other item that interested me was the vintage Leo Quan 'Badass' wrap-around bridge/saddle.  It's a really cool piece of nostalgia, and no longer available on the market.

After acquiring a three-way switch; a couple single-coil magnetic pickups; volume and tone pots; and an output jack, it was time to commence building.

Pickup surrounds, switch base, and the scratch guard are all handmade from rosewood sheeting left over from the 'Elvira' acoustic build.  On the backside, the cavity covers for the electronics were made from surplus wood sheeting.

The wood body required shaping and sanding to remove imperfections, and then it was ready for sealing, priming and painting.  The rosewood pieces were sealed and clear coated to allow the grain to show, which is a nice contrast to the black body.

Magenta, green, and gold are all secondary colors, which work well together on the black surface, which is pretty stark looking as a stand-alone paint scheme.

I like having 'Cristine' in my life, 'cause she brings everything to the party.

Wednesday, October 1, 2014

Wanna Really Cool Banjo?

I bumped into a lady the other day who wanted to sell a banjo.

Why do I need a banjo?  I don't play one. I don't know much about them.  I've always thought you had to wear overalls and spit tobacco to own one.

Oh, well, "Let me think about it", I told her.  "I'll call you if I decide to buy it."

I beat feet home to Google the banjo details.  Not a lot of info, but what I did learn led me to make a decision . . . I now own a very rare and old (91 years) House of Stathopoulo Peerless 'Supurb' model 4-string plectrum banjo.  This thing is in immaculate condition for its age.  It even came with the original hardshell case, which is beat up, but that's why the banjo is in such good shape . . . it was well protected.

Take a look, then I'll share some details.


Now, that I've peeked your curiosity I'll share a few details about this little devil.

What little information I could find says that the House of Stathopoulos Company was founded in 1873 by Anastasios Stathopoulos, a maker of fiddles and lutes.  Stathopoulos moved to the Long Island City in Queens, NY in 1903, from what was then Smyrna, Ottoman Empire (now Izmir, Turkey).  Anastasios died in 1915, and his son, Epaminondas (Epi), took over the company.  Just after the end of WWI, the company began to make banjos (the period when this banjo was produced - 1923, and it sold for a whopping $102 - a great amount at the time), and continued until 1928, when the company took the name Epiphone Banjo Company, producing its first guitars (Epiphone, named after 'Epi' Stathopoulos) in 1928. Deaths in the family and a labor dispute in 1951 forced the company to relocate from New York to Philadelphia.  The company was bought in 1957 by its main rival, Gibson.  If you insist on knowing more, Google Epiphone guitars for a rundown.

So, you can see that this banjo is vintage.

OK, now to the good stuff.

It's a long scale banjo with 22 frets, which makes it a 'plectrum', rather than a 'tenor', a reason beyond age for its rarity.  It's in exceptionally good condition.  With the exception of the head, which is a newer replacement and the Grover replacement bridge, everything about the banjo is original.  The neck is straight and all the frets are solid and show very little wear.  The Grover tuners are in perfect condition, as is the adjustable tailpiece and all the other hardware.  All binding is intact with no separation.  The stainless body pieces are original and in fabulous condition.  The wood body shows a little crazing of the finish and surface scratches, but otherwise it is in excellent condition.  Geez, I hope I'm in as good shape when I'm 91 years old.

If you like pickin' and grinnin', it's going on eBay for auction.

Tuesday, September 30, 2014

Swap Meet Score

I bopped over to the monthly swap meet this past weekend hoping to find a few unusual trinkets I could use to decorate or enhance a cigar box guitar.  Nothing to cart home!

But, I ventured into the vintage tool arena hosted by my friend Tim, and lo and behold he had a Fender F-35 acoustic guitar propped against the wall for sale.  I checked it out and discovered that it was in excellent condition for a guitar made in the '70s.  Neck is straight, frets show no wear, tuners like new, no strings, but who cares, 'cause that's a simple and necessary fix, missing pick guard, but again that's an easy thing to correct, very light surface scratches on the top and back, sides show no wear, a few indentations on the neck underside from a capo, and ordinary wear from playing, and the bridge shows some wear from inside case scuffing.  Overall condition is 8 out of 10.


In the meantime our friend Ken came over to the booth (he is an artiste extraordinaire) to see what we were up to.  I negotiated Tim down to a reasonable price and bought the guitar.

Could have sold it twice on the way out, but that's no fun, I had to take this thing home to set it up to play.

Ken did fix me up with all the ivory and ebony I can ever use for fretboard inlays.  He really is a talented guy.  One of Ken's fascinations is to create 'piano men' from discarded grand piano parts, for guys like me to expand our imaginations in the creations of funky art, which Ken displays at museums and art shows around the country.  It's really a big deal!  I've created two displays and plan to do another.

Strings and pick guard were installed, and I polished the surfaces before firing this thing up.  It plays and sounds great, because the action is comfortable and the body is a mini-jumbo (according to the Fender Guitar Company website), and as near as I can determine the guitar was built in 1973. Unbelievable condition for a 40-year-old instrument.

It's going on eBay for sale, so if you want a really nice guitar take a look, or contact me soon and we'll make a deal.