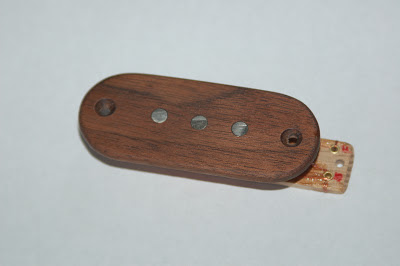
Finally, I cleared my bench and was ready to attack the project of creating my first guitar pickup. Several weeks ago, I had transformed my antique treadle sewing machine into a pickup coil winder (prior post), but there were still some critical things to accomplish.
First, I had to acquire magnetic coil wire, and that problem was solved with a little searching around town. A local electronics shop didn't have the recommended 42/43 ga. wire, readily available through supplier Stewart McDonald at nearly $35 a pound (and gas is expensive you say!), but they had a five-pound spool of 39 ga. Well, I thought, if 42 ga. will work, why not 39 gauge? So, I called StewMac for help, and the guy I talked to said, "Sure it will work, you just will need less wraps of wire on the bobbin to reach the required resistance. Wow, $45 later, I was in the wire business (5 pounds no less!).
I had already located steel pegs for the pickup posts through a supplier that didn't charge an arm and a leg just because it was for a guitar. And, I found another source for inexpensive two-conductor shielded wire to attach the pickup to volume/tone controls and output jack. Why, I wonder, is the same stuff so expensive when it is supplied by a guitar shop?
Now, it was time to design a bobbin (that's the basis for a pickup).
How do I know this stuff? I research everything, and ask a lot of questions of the guys who have already made the mistakes. Thanks Roger, Ted, StewMac, and the web location 'Instructables'.
I decided on a simple design for my TotalRojo guitar pickups, and created a template for three- and four-string versions. I like simple, because it fits my design ideas better. But, I also like the designs that others do as well.
After selecting the wood for the top and bottom of the bobbin, I drilled holes for the posts (this has to be precise, because post alignment is critical) and metal grommets, where the coil wire and lead wires are soldered after completion of the winding. The posts were super glued to the openings in the top and bottom pieces. The very fine magnetic wire was threaded through the 'start' grommet, and the bobbin attached with double sided tape to the wheel on the winder. I wrapped the first few revolutions by hand, and then it was time to let the motor turn the wheel, thus winding the coil. I turned the speed-controlled motor on and started winding the coil, while carefully feeding the hair-fine wire onto the bobbin. I wanted a warm sound from the pickup, so I chose to experiment with 7,000 wraps on the bobbin (a suggestion from the guy at Stewey). The tail of the wire was inserted into the 'finish' grommet and wound several times to hold it in place. I then lacquered over the wires to hold them firmly to the bobbin bottom.


Everything went well, and after a short time, I had a wound pickup. The rest was easy. Solder lead wires into correct grommets, coat the coil with lacquer, wrap the coil with protective tape, attach volume pot and output jack, and test it.
Voila! It works! And, it sounds good.
I will now tweek the design and construction to make for a really sanitary finished product, but I am very happy with the first effort.


