Pages

Wednesday, September 7, 2016

'Donatella'

It's taken a bit longer than I had hoped to complete the latest guitar project, but 'Donatella' is off the bench and making music.  From the headstock to the tailpiece inlay, this guitar is unique and very different from the others I've built.  Sure, it looks similar, because it is the same modified
dreadnought shape as the others I've created, but that's really the only construction similarity.

The Martin Guitar Company designed and built the first dreadnought guitar in 1916 for the Oliver Ditson Company, and it wasn't until 1931 that Martin produced dreadnoughts carrying the Martin name.  This particular design has been the most copied by other guitar makers because it's currently considered the 'standard' acoustic guitar body style.  It's comfortable to play.  It has an incredible sound delivery.  And, it looks great . . . some say it has the shape of a woman.


Every guitar I build commences in my head with an imaginary concept for the final product.  But, in each case, I visualize a specific element and move on from there.  The bridge design for 'Donatella' is what drove the overall design.  I had the basic shape in mind, and the shape of the headstock and fretboard followed.


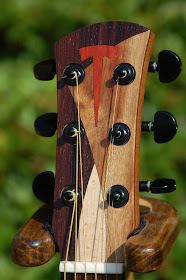
The headstock shape follows the subtle curves of the bridge, and the overlay consists of individually hand-shaped pieces of Indian rosewood, Carribean rosewood, birdseye maple, and the Chatke coc (red heart) 'T' logo inlaid in position.

I chose black Grover closed-gear tuning machines so as not to contrast greatly with the design.

The recessed tuner nuts and washers serve two purposes, to compensate for the added thickness of material, and to provide a more refined look to the headstock.

The nut at the leading edge of the fretboard is handmade, as is the saddle, from a piece of bison bone.


The neck is a solid piece of mahogany contoured to a 'C' shape and customized at the heel to add a little color to the underside of the guitar.


The fretboard is the other element that was a driving force in the overall design. The grain in Ziricote wood is my absolute

favorite, and I was determined to make the fretboard and bridge from the same stick of wood.

To let the fretboard stand on its own without intrusion from traditional dot-shaped position markers, I chose to insert small pieces of maple and red heart on the bass string side of the board, and carried on the simple design to the bridge.


The body is what really makes this guitar stand out.  The shape is one thing, but the wood grain is what makes it pop.  There is, in my opinion, nothing that compares to the color and grain of the spruce used in building tops for acoustic guitars.


To add color and definition to the top, I chose to create a soundhole rosette made from seventeen individually hand shaped pieces of exotic wood.

The random design with the subtle angular shaped pieces carries on the headstock design.


But, the Pau Ferro (Bolivian rosewood) sides and book matched back with Indian rosewood binding complete the body design in a way far beyond what I had rolling around in my head a couple months ago.  (The dark spots on the side near the bottom are shadows created during this amateur photo shoot).


And to finish off the body, I decided to add a custom inlay touch to the tail where the abalone-enhanced ebony strap button, which matches the bridge pins, is located.


I will briefly mention a few construction highlights that make this build a little different.  The finish is sprayed satin, which gives the guitar a soft appearance, and it lets the wood grain stand out.


Internally, the 'X' bracing is all hand formed and scalloped and finish sanded.


The back braces have a special treatment whereby I drilled equally spaced holes in each brace to give them a customized appearance.


The rib bracing has the same scalloped treatment.


Pau Ferro Custom Acoustic Guitar

Body                      14-fret dreadnought
                                Sitka Spruce top w/custom inlay rosette
                                Pau Ferro sides and back
                                East Indian Rosewood binding
                                Custom handmade Ziricote bridge w/custom bison bone saddle and ebony pins
                                Hand-rubbed satin finish
                                Custom scalloped ‘X’ top bracing
                                Custom scalloped ‘ladder’-style back bracing

Neck                       One-piece mahogany, standard ‘C’ profile
                                Dual-action adjustable truss rod
                                Custom inlay headstock overlay
                                Custom handmade Ziricote 14-inch radius fingerboard w/custom position markers
                                25.4-inch scale
Custom 1-11/16 bison bone nut
Grover black enclosed-gear tuners recessed into the headstock overlay
Hand-rubbed satin finish

Extras                   Elixir extra light strings
                                Inlay hand-cut and assembled from exotic wood
                                Custom inlay tailpiece w/ebony strap button

                                Ziricote heel cap

Saturday, September 3, 2016

Acoustic Neck Angle -- 'How To'

I've learned a thing or three in the challenging and exhilarating few years that I have been creating acoustic guitars, but the most challenging has been dealing with 'neck angle'.  And, it's not an easy subject to research, because of all the bogus information floating in cyberspace and the reluctance of manufacturers to share their secrets.  And, what I've read in construction manuals and books does not adequately deal with the issue.

What am I talking about, you ask?  I'm referring to the open space (gap) between the bottom of the fretboard and the top of the guitar body (between the heel and the soundhole) when the neck is attached to the guitar body if the angle is incorrect.  This gap occurs when the angle of the neck does not coincide with the angle of the top.


However, inside the many Google references I spent hours plowing through, I stumbled onto an article which was written by K. M. Cierpilowski, of Kenneth Michael Guitars.  This article deals with the subject I had been struggling with for months.  If you are a novice guitar builder such as myself, or the confirmed expert, you can learn something from this article at (http://kennethmichaelguitars.com/neckangle).

The drawing below illustrates what can be done to address the neck angle dilemma.  But, in a brief explanation, the process goes like this . . .


The top edge of the rim is sanded flat from the tail block to the edge of the gray area referenced in the illustration, then slopes down to form the required complementary angle to match the neck heel, which results in the straight line fingerboard plane.

Instead of raising the soundboard or filling the gap with added material under the fingerboard extension, the neck joint is actually lowered slightly relative to the top edge of the rim.  All that is required is to sand a slope on the top edge at an angle from the waist curve to the neck block.  In effect, the top plate has a tiny invisible bend starting at the waist curve.

But, the dilemma for an amateur builder (myself) is how to accurately sand the slope on the top.  Top line guitar producers use automated large disc sanding equipment that is simply unavailable to me, so I had to determine a simpler way to accomplish the task.

In studying the pattern I use for marking the wood sheets used in producing body sides, I realized a gradual, but definitive, slope exists in the design where the guitar back meets the neck heel.  

So, why can't that design be applied to the top?  It can!

Instead of sanding a slope on the top, I decided to experiment by incorporating the back slope design logic to the top.  After determining the required distance from the waist to the center of the neck joint opening in the body, and determining the degree of neck angle, I returned to the side pattern template I use and applied a two-degree slope from the center of the waist forward.

Yes, it was an experiment. I bent the newly profiled ribs and glued up the heel and tail blocks in the same manner that I've always used, and applied the liner.  Then I glued the back to the ribs, and then the top was glued in position.  The process was either going to work or not, but my options for addressing the neck angle problem were less than two!  If it didn't work, the body would become a new design for a drum.  If it did work, I had solved my dilemma.  In a cost/benefit analysis, what was there to loose?

It worked!  

Friday, September 2, 2016

So, You Want to Build a Guitar!

From my point of view, there are probably more enjoyable and satisfying things to do than building a guitar, but I cannot think of anything.

There is no magic age at which to commence the process, and no one is too old. I built my first guitar after I retired.  I had read a short blurb in a magazine about guys who build playable guitars from cigar boxes. I thought, "Hell, I can do that!"  And, I did . . . dozens. 


The 'Hemingway', my first guitar creation.

And, along the way, as my confidence grew, I built several solid-body six-string guitars and repaired many others for different people.  


'Curly' was my first solid-body electric build.

Then, a minor incident, open-heart surgery, set me back for a couple months, but I was back in the shop very soon.  I was hooked!  

Two very important aspects of the surgery occurred . . . the surgeon saved my life, and he also insisted that I build full-size acoustic guitars.  He collects guitars and was really inspired by my funky little creations, so much so that he now owns a few.  I put off his encouragement as long as possible, but I finally caved to his persistence.  Thanks, Doc, it's a helluva ride!


The 'Geisha' is my most recent dreadnought acoustic creation.

Building a guitar is one of the most exciting things you can do, but it can be a complex process, especially when it will be your first attempt.  It's not difficult, but it is complex, because of the many steps involved in construction, and the multiple skills required.  

However, there are some considerations to be addressed, before you order that super-duper kit you saw advertised in a magazine or on the web, and you run off to the garage for your bag of hand tools.

Consider This . . .

1.   Plank or Acoustic?


Yes, there is a difference, and from a construction standpoint, it's enormous.  But, neither style is without complexity.

If you want to blow the windows out of your bungalow and to keep your neighbors down the road entertained, choose a plank . . . a basic solid-body electric guitar played through an amplifier.  

You don't have access to an amp, so being plugged in isn't an option.  Well, don't fret, no pun intended, but an acoustic guitar will be the ticket.  However, it won't hurt if in another life you were a cabinetmaker and your skill set falls on the side of Michelangelo. 

Either way, you can do it.  The process is just different.


2.   Do Your Homework.

Research your project, BEFORE you decide anything.

There are numerous books and websites, which will help you to understand the complexities associated with building a guitar.

Talk with experienced builders (luthiers) and visit a factory (Martin, Gibson, Taylor, etc.) if possible.

Visit your local music store to look at how various modes guitars are basically constructed. If they have a technician on board, pick the person's brain.


3.   Jepetto Needs a Workshop.

You'll need a place to work, and it's not very likely the dining room table will be available. Your space need not be large, but it should be organized.  Try to picture in your mind the layout of tools and equipment.

The most useful things will be a workbench and storage area.

Make a list of the things you'll want . . . you can do most everything with hand tools, but there are a certain precision and convenience surrounding power tools . . . band saw, drill press, table saw, rotary/belt combo sander, small air compressor, and a few more choices to make.

Yes, there are costs associated with your new hobby, but you don't need top-of-the-line equipment, so save your money to purchase exotic wood for the masterpiece build, down the road.


4.   Tools, Jigs and Templates.

I won't get into listing the hand tools you'll need, but I can tell you there will be many. Carefully consider what you will need for the first build.  It's easy and enjoyable to hit the local hardware store to buy everything in sight, but don't do it.  

Compile a list of basic items you'll need, and commence your build with them.

Jigs!  If your first build must be an acoustic guitar (I don't recommend this) you will need to purchase, or build your own jigs, and I will tell you that when I launched into acoustic space the first month of work was devoted to designing and creating the jigs necessary to build my first acoustic.guitar.

You can determine what you need by exploring what other guitar builders use, or you can review the list I recommend, in a post on this blog, or take a look at posts of the various jigs, molds, and tools I've built.

You'll find that design templates are a requirement, which eliminates guesswork and makes completion of your project easier.

I'm glad I cut my teeth on cigar box builds first, and then moved on to electric solid-body creations, before setting out on the acoustic trail.


5.   Keep the Design Simple!

Make the design for your first guitar simple.  The goal is to create a playable instrument.  It can look fantastic without being complicated.  The funky decorative stuff can come later after you have developed expanded skills.

There is a lot to learn, so don't complicate the process by adding a level of unnecessary difficulty, which may create anxiety and take the fun out of the process.

Some crusty old cowboy once said, "A man has to know his limitations!"  Know your limits and plan your first guitar build accordingly.

Guitar building is an addictive hobby, and it very likely that you will build more than one guitar, so make your initial project as simple and enjoyable as possible.  And, accept the fact that it is a long and winding road to proficiency.


6.   Govern Your Expectations.

I can tell you from experience, many first-time guitar builders want to build the perfect guitar right out of the gate.

You must maintain perspective.  Most experienced guitar builders have developed their skills and molded their craft over years of experimentation, practice, and mistakes.

Expect to make many mistakes and to be OK with it.  Don't expect your first building attempt to be flawless, that's not realistic. But, you can expect that your second guitar will be better than the first, and the next will be better than the last, until that day when you create a really great guitar.

Look at the building process as a journey, not a destination.  Your objective is to finish the process, learn from it, and move on to the next.  Expect to mess something up, but strive for perfection.

Your first guitar will be special to you because you will have accomplished a complex project by producing a musical instrument you will be proud to share with others. 


7.   Stay Out of Your Own Head.

First-time builders tend to recycle thoughts in their minds, by thinking, re-thinking, and over-thinking the project.

You will get trapped in the 'thinking' process and mental paralysis will set in.  You will be terrified of making a decision for fear that you've not figured out every single piece of this exciting new puzzle.

"A turtle never takes a step, until it sticks its head out!"  Stop thinking, and start building!

Keep your design simple, and keep your expectations realistic.

Work from a plan.  It can be something you've created, or it can be one you have acquired from an outside source.  But, make sure it is full-scale of the guitar you're building, which will allow you to take precise measurements directly from the plan.

Building a guitar, any guitar, is not a sacred event to be shared only by the most talented members of the special community of highly trained luthiers.  You don't need club membership or permission from the Grand Puba, all you need is your own commitment.


8.   Mistakes Are Acceptable.

Mistakes are not something to fear.  They can be corrected and built on.  The more mistakes you allow yourself to make, the fewer mistakes you will make.  It's called practice, and practice makes perfect.

Accept the reality.  You will screw something up.  So, what!  Correct your mistake and move on.


9.   Stay Awake, There's Danger Lurking in Your Shop.

Guitar building is woodworking and that involves the use of loud power tools with sharp blades, sawdust (man glitter), and solvent fumes.

It should be obvious that power tools are made to bore and cut, and it doesn't matter to the tool if it's wood, metal, or human flesh, so STAY AWAKE when using tools.

The less obvious dangers in your shop will be silent . . . sawdust and toxic fumes.

So, wear eye and ear protection when using power tools, and keep your hands away from turning blades.  And, invest in a good mask to filter air particles that will have long-term negative impact on your health.


10.  Remember, Guitar Building is a Hobby.

Unless you're struggling to make a living building guitars, this should be an enjoyable hobby for you, and by definition, it should be fun, satisfying and rewarding.

If you're not having fun, it's probably because you're overlooking some of the considerations mentioned here.

Keep it simple, manage your expectations, stay out of your own head, accept mistakes, respect the dangers, and have fun.